Checking the alternator

The alternator supplies all electrical components in the vehicle with electricity. Should the alternator lose its full functionality, the electronics will fail after a certain period – the battery will no longer be charged, and the vehicle will no longer be roadworthy. In order that this does not happen, any faults should be detected in good time. We therefore provide you with various problem descriptions and detailed solutions in the following

Important safety note

The following technical information and practical tips have been compiled by HELLA in order to provide professional support to vehicle workshops in their day-to-day work. The information provided on this website is intended for suitably qualified personnel only.

1. Basics

Alternator

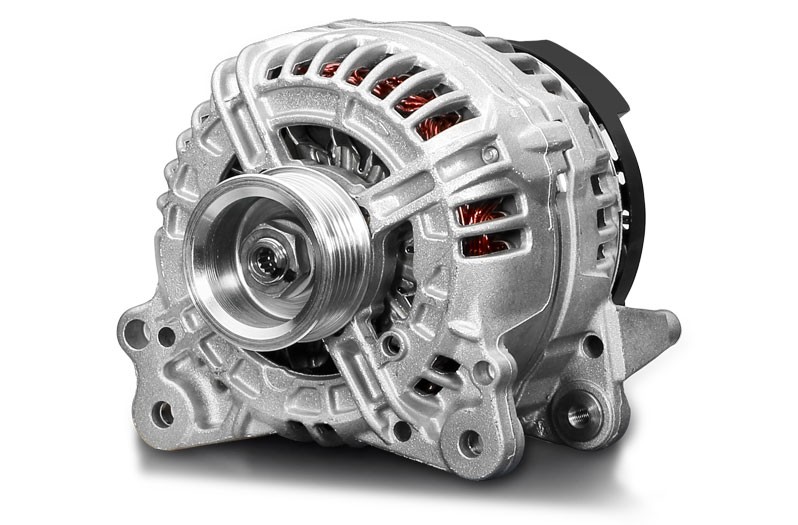
Illustration of a vehicle alternator

The task of the alternator is to supply all electrical consumers within the vehicle with energy while charging the battery at the same time. Three-phase alternators are generally installed in modern vehicles.

The alternator power, battery capacity and the total power requirements of the vehicle's electrical system are matched to each other.

2. Function

Design and function of the alternator

The alternator is usually composed of the following components:

  • Housing
  • Stator
  • Alternator rotor
  • Alternator regulator

The stator with three-phase winding is mounted in the alternator housing. Claw poles, excitation winding, fan and slip rings are mounted on the shaft of the alternator rotor. The pulley is mounted on the front of the external part of the shaft. The electronic control unit with carbon brush brackets is attached in the rear area of the alternator.

Function

Electricity is generated in the three-phase alternator on the induction principle. An electrical voltage is generated in the stator winding when the magnetic field within this winding changes. This change in the magnetic field is generate by the rotating alternating rotor. A sinusoidal alternating voltage is generated by the changing magnetic field with alternating north and south poles. This alternating voltage, which is unsuitable for the electrical system in the vehicle, is converted to direct-current voltage by the rectifier. The control unit adjusts the alternator voltage to the respective operating state of the motor and to the voltage requirements of all consumers in the system.

3. Symptoms

Alternator faulty

The following symptoms may indicate a fault in the alternator:

  • Charging indicator lamp lights up
  • Starting difficulties due to insufficiently charged vehicle battery.
  • Vehicle battery becomes hot due to overload
  • The illuminance of the headlamp deviates in relation to the engine RPM
  • Bulbs burn out more quickly than normal
4. Cause of failure

Causes of faulty alternators

An alternator malfunction can have different causes. The cause is not always due to an internal alternator fault, such as a faulty winding, rotor, rectifier or control unit. Before replacing the alternator, additional components should be considered as a cause of failure and checked.

  • Prematurely aged or faulty vehicle battery
  • Electrical connections on the alternator loose or faulty
  • V-belt or V-ribbed belt loose or faulty
  • Belt tensioner or free-running roller damaged
5. Troubleshooting

Testing the alternator

When performing troubleshooting on the alternator, the following fundamental rules are to be observed:

  • Do not disconnect, short circuit or mount battery or connection terminals when the engine is running or the alternator is in operation (voltage peaks can lead to damage)
  • Never perform voltage or current measurements via short circuit (voltage peaks) - use a voltmeter or ammeter

A multimeter and a clip-on ammeter are required for troubleshooting. Please also refer to the technical info: " Ground (31) "

Notice

When performing welding work on the vehicle and when removing or installing the alternator, the battery must be disconnected

1

Charging indicator lamp flickers

Cause:Remedy:
V-belt too looseTighten V-belt
Setting of the contacts incorrect or the control unit resistor burnt out
(Only with contact control units)
Adjust contacts, replace resistor or control unit

2

Charging indicator lamp lights with unchanged brightness at an increased RPM.

Cause:Remedy:
Cable D+/61 has a short circuit to frame
  • Remedy the short circuit to frame
  • Replace cable
Control unit faultyReplace control unit
  • Rectifier damaged
  • Collector contaminated
  • Short circuit in cable DF or in the rotor winding
Check alternator and repair or replace if necessary

3

Charging indicator lamp lights up brightly with the ignition switched on, but dims or flickers when the engine is running.

Cause:Remedy:
Contact resistance in the charging current circuit or in the cable for the indicator lampCheck cable and connections, and replace if necessary
Control unit faultyReplace control unit
Alternator faultyCheck alternator, repair or replace if necessary

4

Charging indicator lamp does not light up with the ignition switched on.


Cause:Remedy:
Battery discharged or faultyCharge battery, check, replace if necessary
Cables or connections damaged, loose or oxidizedCheck cables and connections, attach, replace if necessary
  • Carbon brushes worn
  • Control unit faulty
  • Carbon brushes
  • Replace control unit
Short circuit of a positive diodeImmediately disconnect battery or B+ (otherwise discharge in situ) and repair/replace alternator
Oxide coating on the slip rings, break in the rotor windingRepair/replace alternator
Indicator lamp faultyReplace indicator lamp

5

Battery is not charged or charged insufficiently.


Cause:Remedy:
V-belt too looseTighten V-belt
Cables or connections loose, damaged, or oxidizedCheck cables and connections between battery and alternator and the respective ground connection, replace if necessary
Battery faultyCharge battery, check, replace if necessary
Control unit faultyReplace control unit
  • Collector contaminated
  • Rectifier faulty
Check alternator, repair or replace if necessary

How helpful is this article for you?

Not helpful at all
5
4
3
2
1
Very helpful
Success

Wrong Captcha

Wrong Captcha

Error

Something went wrong

Spare Parts Finder
Manual vehicle identification OE-No.
Top manufacturers
Other manufacturers
Vehicle series Back
Vehicle Back

Enter the OE number in the input field. You will usually find the OE number on the spare part itself or in the vehicle documents.

Spare Parts Finder
Also determine spare parts with OE numbers Detailed product information Find wholesalers near you
dummy
Processing Selected Car
Manufacturer
Vehicle series
Vehicle
Engine output
Engine displacement
Fuel type
Construction year
Engine code

Choose category:
Back
dummy
Teilen Sie
Send via Copy link
URL copied to the clickboard !
Article NUmber
Number
Article Number Was Copied !
Search The Web Mounting Instructions
More Details
Name Value
Less Details

Your Dealer
Autoteile Krammer GmbH
dummy
Lechstraße 1-3
68199 Mannheim
Show Map

You might also be interested in

Tire pressure monitoring system tpms
Basic Knowledge
TPMS – tyre pressure monitoring system
Overview of direct and indirect tire pressure monitoring systems (TPMS) - everything you need to know for the vehicle workshop.
Reading Time: 15 minutes
Electric hatchback actuator
Basic Knowledge
Electric hatchback actuator: troubleshooting
Find out how to systematically diagnose and specifically narrow down common faults in the electric hatchback actuator.
Reading Time: 8 minutes
A vehicle with an active ADAS system recognises pedestrians and e-scooters in urban traffic by means of radar and sensor signals – a good example of autonomous driving and sensor fusion.
Basic Knowledge
ADAS and autonomous driving: an overview for workshops
Everything you need to know about ADAS and autonomous driving: functions, sensor fusion, AI and diagnostic devices – concisely explained for automotive professionals
Reading Time: 14 minutes
HELLA 77 GHz radar sensors: Design, function and applications
Basic Knowledge
Maintenance and diagnostics of 77 GHz radar sensors
Find out how the HELLA 77 GHz radar sensor supports driver assistance systems and accurately identifies objects in any weather conditions. Discover the design, function and applications in the vehicle.
Reading Time: 7 minutes
E-mobility
Basic Knowledge
E-mobility in everyday workshop activities: technology and requirements
Electromobility is changing workshop processes: find out how workshops handle high-voltage systems, new diagnostics procedures and targeted qualifications
Reading Time: 16 minutes
Injection nozzle/injection valve
Basic Knowledge
Injection nozzle/injection valve – Function & checks
Find out how to diagnose a defective fuel injector and replace it in the workshop.
Reading Time: 6 minutes
Basic Knowledge
Checking the exhaust gas temperature sensor
Step-by-step instructions for testing the exhaust gas temperature sensor - shown on the VW Passat 2.0 TDI.
Reading Time: 3 minutes
Accelerator pedal sensor
Basic Knowledge
Accelerator pedal sensor – function & design
Important tips for checking the accelerator pedal sensor and rectifying defects - practical knowledge for your workshop.
Reading Time: 3 minutes
Air-mass sensor
Basic Knowledge
Air-mass sensor - Function & troubleshooting
Learn how to check a mass air flow sensor, detect defective sensors and replace them professionally.
Reading Time: 2 minutes
Camshaft position sensor
Basic Knowledge
Camshaft position sensor - function & troubleshooting
Learn all about the function and testing of the camshaft sensor and possible symptoms of a defect.
Reading Time: 2 minutes

Quick question

How likely is it that you would recommend HELLA?

highly unlikely
very likely
highly unlikely
very likely

Thank you very much!

Your feedback helps us to further develop our services.