Rain sensor & headlight sensor testing - repair instructions & fault diagnosis

Here you will find useful knowledge and handy tips relating to the rain sensor - light sensor in vehicles.

The rain sensor is a driver assistance system which takes the strain off the driver by automatically activating the windshield wiper system when it rains and thereby significantly improving in-vehicle safety and comfort. In the mid-1990s, the rain sensor started to be fitted in vehicles and since then has been a permanent feature of modern vehicle electronics. 

Important safety note The following technical information and practical tips have been compiled by HELLA in order to provide professional support to vehicle workshops in their work. The information provided on this website is intended for use by suitably qualified personnel only.


Initially integrated in the mirror base of the rear-view mirror, the rain sensor is fitted on the inside of the front windshield outside the driver's field of vision. Within the sensor area, the sensor detects when it is raining and transmits its information to the windshield wiper's control electronics. The wiper frequency in the intermittent wiper setting can therefore be automatically adapted to the intensity of the rain. Thus, manual intervention by the driver is now more or less unnecessary. 


The combined rain-light sensor combines two functions in one module.

  • Detection of rain and automatic control of the windshield wiper
  • Recording of ambient brightness and automatically switching the vehicle lighting on and off


The rain sensor is usually activated by actuating the intermittent or automatic wiper function on the steering column switch (Figure 2).


Turning the light switch to the AUTO position (automatic daytime running light control) activates the light sensor and the lighting is switched on or off depending on the ambient brightness (Figure 3). 

Rain sensor

The rain sensor detects precipitation on the windshield using an optoelectronic method of measurement. The sensor element comprises one or more light emitting diodes (transmitters), a prism and a photodiode (receiver). A light beam produced by the light emitting diode passes via a prism to the windshield, is reflected several times by the outer windshield surface and forwarded to the photodiode.


The combination of sensor position and dry windshield surface enables maximum reflection of the light beam (Figure 4). 


Raindrops on the windshield change the reflection properties to the extent that all light beams no longer reach their target and are deflected by the drops of water (Figure 5). 


The greater the intensity of the rain, the less light reaches the photodiode. The evaluation electronics use the irradiance to calculate the amount of rain currently on the windshield and transmit the information needed from the windshield electronics in order to control the wiper speed. The sensor continually takes measurements so that wiping can be individually adapted to the amount of precipitation. If heavy rain or spray from a vehicle driving in front is detected, the system automatically switches from the intermittent setting to the highest wiper setting. 

Light sensor

The external lighting conditions are measured by an optoelectronic detector. Using an upstream filter glass, the sensor records special wavelengths in order to distinguish between artificial light and daylight. The ambient light and front-end lighting are measured by two sensors, which function independently of one another. 


The illuminance around the vehicle is recorded using the ambient light sensor over a large spatial angle (Figure 6). 


The light intensity in front of the vehicle is recorded with the front-end light sensor over a small angle (Figure 7). 


In order to do this, the sensor's receiver characteristics must be matched to the installation situation. A special algorithm uses the sensor data and by including further information from the vehicle electronics detects various lighting conditions (day, night, dusk or passing through a tunnel/bridge) and switches the daytime running light on or off accordingly. 

Upgradeable functions and areas of application

Given the modular structure, up to five functions can be integrated in the current generation of rain-light sensors. 

In addition to recording rain and light, the following sensor functions can also be covered as options:

HUMIDITY MEASUREMENT

The condensation sensor transfers to the air conditioning unit the relative humidity and temperature measured on the inside of the windshield. This information is evaluated by the air conditioning control unit to control the air conditioning in the vehicle interior, such as automatic ventilation of the windshield. 

SOLAR SENSOR

The solar sensor records the insolation through the windshield affecting the driver and passenger and transmits this value to the air conditioning control unit. The information is evaluated in the control unit and used to control the air conditioning in the vehicle interior. The spatial sensing area of the solar sensor corresponds roughly to a hemisphere, which is tilted forwards by the inclination of the windshield.

HEAD-UP-DISPLAY LIGHTING

An additional sensor (HUD) records the illuminance in front of the vehicle. The receiver characteristics of this HUD sensor are lower than the characteristics of the front-end sensor and are comparable with the driver's viewing angle. If there is a head-up display in the vehicle, this information can be used to adapt the light intensity of the display projected onto the windshield. Depending on the current lighting conditions, display legibility is optimised for the driver.

ADAPTION TO THE WINDSHIELD CONDITION

The rain sensor adapts permanently to the relevant windshield condition in the sensor area. Age-related signal changes caused by scratches or contamination are taken into account by corresponding adaptation routines in the software of the sensor and/or control unit. Differences between this area and the windscreen area viewed by the driver/passenger cannot be detected by the sensor.
There is also a heater integrated in the sensor element to prevent incorrect interpretations in the event of moisture from condensation. New generations of sensors use infrared light and can therefore also be fitted in tinted parts of the windshield.

WEATHER CONDITIONS

The sensor cannot differentiate snow and ice from rain. When it is snowing, the sensor / wiper characteristics are comparable with those encountered with large raindrops. If the windshield is iced over and the vehicle is stationary, wiping is suppressed depending on the outside temperature. To prevent the windshield from being wiped during travel, the driver must switch the system off and actuate the wiper manually.

RAIN - LIGHT SENSOR - COMMUNICATION AND SYSTEM INTEGRATION: OVERVIEW

The system overview illustrates how the sensor can communicate with other system components in the vehicle via the LIN interface by way of example. Here the sensor is switched on by the overriding control unit and supplied with voltage. The sensor only provides the system with information, but does not itself have direct access to the system and/or actuators. 

Safety functions

Should the rain sensor malfunction, the wiper module of the vehicle in question takes over intermittent-wiper control. Regardless of the sensor function, the windshield wiper can always be actuated manually using the control lever.
 
Should the light sensor fail, the daytime running light is switched on in the safe "Light on" status. Regardless of the sensor function, the light can however be switched on and off manually via the switch. 

REPLACING THE RAIN SENSOR: REPAIR INSTRUCTIONS

The following service work is illustrated on a 4th generation rain-light sensor by way of example, but can also be undertaken on sensors constructed in the same way.

Video: Replacing the rain-light sensor

This video provides important repair instructions on replacing the rain-light sensor. 


02:37 min

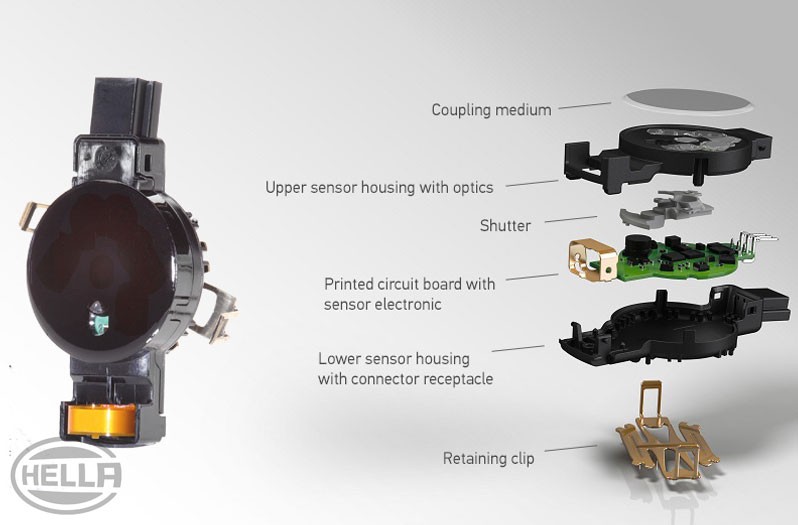
Removal instructions for the rain sensor

  • Remove vehicle-specific cover on inside of windshield
  • Carefully disconnect electrical connector from connector housing
  • Gently press down retaining spring and use a small screwdriver to release from the lock
  • Release the sensor and gel pad from the windshield by slowly and repeatedly pulling on the plug side without exerting force, and remove
IMPORTANT NOTE

In order to remove the rain sensor from the windshield without any damage, the pressure on the coupling medium (gel) must first be relaxed. This takes approximately 30 minutes at 20°C. The coupling medium may be destroyed by rapid, careless movements or jolty pulling actions. 

Installation instructions for rain sensor

  • The assembly area on the windshield must be free of contamination, such as fibres or grease, and be dry. If necessary, the area should be cleaned using an alcohol-based cleaner.
  • The coupling medium must be intact, clean and free of air inclusions. If damaged, the coupling medium, or if necessary the entire sensor, should be replaced.
  • Gently press on the two spring clips on the retaining frame to position the sensor in the assembly area. Now audibly engage the retaining clip by increasing the pressure on the right and then the left spring arm in turn. The sensor should not be tilted while increasing pressure. Do not engage both spring arms at the same time!
  • Then perform a visual check of the catch mechanism on the fastening element. 
  • Lock electrical connector in connector housing and check it is seated correctly.
  • Perform visual inspection of windshield in sensor area after assembly.


Air inclusions of up to 1 mm in diameter are permitted between the windshield and coupling medium immediately after assembly. Over time these inclusions are displaced by the force exerted by the sensor springs.

Assembly instructions for fastening/coupling medium

The optical sensor is fastened on the windshield with the aid of a coupling medium, which forms a level layer on the optical sensor. The coupling medium (gel) smoothens out unevenness between the optical sensor and windshield, producing a defined optical interface. Incorrect assembly may result in malfunctions or sensor failure.


Depending on vehicle manufacturer, different fastening elements or coupling media may be used. Therefore, please observe the relevant vehicle manufacturer's removal and installation instructions ! 

NOTE RELATING TO STORING THE SENSOR WHEN REPLACING THE FRONT WINDSHIELD

In the time between disassembly and reassembly, the sensor must be protected from dirt, mechanical and electrical damage. The sensitive coupling medium should be covered by a clean and dry plastic film. To protect the sensor from electrostatic damage, it should be put into intermediate storage in a dry plastic box. 

CHECKING THE RAIN - LIGHT SENSOR: FAULT DIAGNOSIS

Video: Checking the rain-light sensor

This video shows you how to carry out a basic function check of the rain sensor and troubleshoot using a diagnostic unit.


03:41 min

Basic function check of rain sensor

The function of the rain sensor can be easily tested by simulating precipitation on the windscreen.

  • Switch on the ignition
  • Change wiper switch to automatic intermittent wiper control
  • Use an aerosol to spray water onto sensor area on windshield


The windshield wipers should now start and the wiper frequency adapt automatically to the simulated "rain intensity". If there is no response but all other manually activated wiper stages are working properly, a diagnostic unit is needed for further testing.

Testing with the diagnostic unit

The individual functions of the rain-light sensor are monitored by the respective superordinate control units. Any errors which occur are stored in the control unit's error memory and can be read using a suitable diagnostic unit. Depending on the system, additional parameters can be displayed and used for troubleshooting. 


The following diagnostics functions can be used as part of troubleshooting:

Fault code

In this function, the fault codes stored in the error memory can be read out and deleted. Information about the fault code can also be called up. 

Parameters

In this function, the current measured values of the sensor can be displayed in the control unit and evaluated.

Basic setting

In this function, the sensor can be taught on the control unit. The rain sensor must be initialised after the following work:

  • Replacing the windshield
  • Replacing the rain sensor

Coding

  • Coding is needed if windshields with different characteristics are replaced or if additional functions have to be released in the control unit.
  • With some vehicle manufacturers, the different glass tints on the windshields (clear/green glass) can be adapted to the sensor.
NOTE

The various diagnostic options have been shown on the mega macs 66 diagnostic unit by way of example. The respective extent of testing and variety of functions may differ depending on the vehicle manufacturer and depend on the respective system configuration of the control unit. 

How helpful is this article for you?

Not helpful at all

Very helpful

Please tell us what you did not like.

To get the free HELLA TECH WORLD newsletter.

Many thanks. But before you go.

Sign up for our free HELLA TECH WORLD newsletter to receive the latest technical videos, car repair advice, training course information, marketing campaign details and diagnostic tips.

Show additional information on our newsletter Hide additional information on our newsletter

Register for our free HELLA TECH WORLD newsletter to stay up-to-date with the latest technical videos, car repair advice, trainings, diagnostic tips and marketing campaigns.

Together we can get cars back on the road quickly!

Please note:
You will only be subscribed to the newsletter once you have clicked on the confirmation link in the notification e-mail you will receive shortly!

Data Protection | Unsubscribe

Please note:
You will only be subscribed to the newsletter once you have clicked on the confirmation link in the notification e-mail you will receive shortly!

Data Protection | Unsubscribe

Almost there!

All you need to do is confirm your sign up!
We've sent an e-mail to your email address.

Check your inbox and click on the confirmation link to start receiving HELLA TECH WORLD updates.

Wrong e-mail or no confirmation received?
Click here to enter it again.

SIGN UP NOW!

To get the free HELLA TECH WORLD newsletter.

Show additional information on our newsletter Hide additional information on our newsletter

Register for our free HELLA TECH WORLD newsletter to stay up-to-date with the latest technical videos, car repair advice, trainings, diagnostic tips and marketing campaigns.

Together we can get cars back on the road quickly!

Please note:
You will only be subscribed to the newsletter once you have clicked on the confirmation link in the notification e-mail you will receive shortly!

Data Protection | Unsubscribe

Please note:
You will only be subscribed to the newsletter once you have clicked on the confirmation link in the notification e-mail you will receive shortly!

Data Protection | Unsubscribe

Almost there!

All you need to do is confirm your sign up!
We've sent an e-mail to your email address.

Check your inbox and click on the confirmation link to start receiving HELLA TECH WORLD updates.

Wrong e-mail or no confirmation received?
Click here to enter it again.