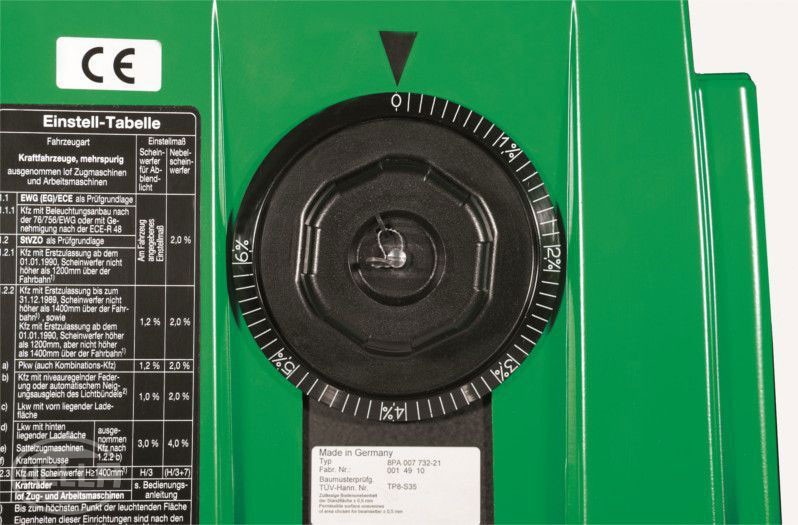
Headlight adjustment

Here you will find useful information and handy tips relating to the adjustment of vehicle headlamps.

Correct headlamp adjustment is a very important safety issue which is frequently underestimated. If the headlamps are set too low, the field of vision is limited during darkness. If they are too high, they dazzle and impair the view of other road users. On this page find out what requirements must be met for the correct headlamp adjustment, and how both classic and modern lighting systems can be tested.

Important safety note The following technical information and practical tips have been compiled by HELLA in order to provide professional support to vehicle workshops in their work. The information provided on this website is intended for use by suitably qualified personnel only.


ADJUSTMENT OF HEADLAMP SYSTEMS: GOOD TO KNOW

Since asymmetric light distribution appeared on the market in 1957, there have also been statutory provisions for headlamp adjustment.


Headlamps were first aimed at the so-called "10-meter wall". That means a vehicle is driven to a distance of 10 m in front of a light-coloured wall which has certain markings on it. The headlamps are then checked or adjusted on the basis of these markings.


This has remained the statutory test method until today. It is still used particularly for checking agricultural or special vehicles. One of the disadvantages of this method is that a relatively large, light-coloured and free wall needs a corresponding amount of space. Both were, and are, not exactly often present in workshops.


These circumstances were also ultimately among the factors responsible for the development of beamsetters. Such devices enable quicker and more flexible checking of light distribution.


The following describes the measuring methods, the legal basis, and the most important stages involved in professional headlamp adjustment.

OPTIMAL BEAMSETTER ADJUSTMENT: INSTRUCTIONS

Measurement method

Beamsetters fundamentally simulate the 10 m wall. The lens installed in the beamsetter box shortens the prescribed 10 m distance to 50 cm (Fig. 2 - lens to aiming screen).


The disadvantages, such as high amount of space and a suitable wall, are omitted. A beamsetter can also be flexibly used at different places within the workshop, provided the workshop floor adheres to the required tolerances.

Headlamp adjustment location

The composition and condition of the floor are of primary importance to enable exact headlamp adjustment. That is why it also has its own standard (DIN ISO 10604) in which the "test surface" is specified precisely and the permissible tolerances listed. The graphics listed in Figure 3 clearly illustrate the requirements.


If these tolerances are not adhered to, even minor deviations have a large impact on the light distribution.


A sample calculation makes this clear:
As already mentioned, a lens is installed in the beamsetter which shortens the prescribed 10 m measuring distance to the wall to only 50 cm. A mere 5 mm measured wrongly on the aiming screen of the beamsetter thus corresponds to 10 cm difference over 10 m (ratio 10 m to 50 cm is factor 20). A vehicle with headlamps installed at a height of 60 cm has a low beam with a range of 60 meters (at 1% forward tilt = 10 cm inclination to 10 m range).


This means that the headlamp light would deviate by 60 cm. This example clearly illustrates the decisive effect that a precise test surface has on light distribution, as millimeters can decide between glare for the oncoming traffic or driving in semi-darkness!

Preparing the vehicle

But not only the floor conditions are important. The vehicle must also be prepared for the test.


The following points must be observed:

  • Test the headlamp function.
  • Check the cover lenses for gravel throw damage, scratches, and for dullness.
  • The tyres must have the prescribed air pressure.
  • Load the vehicle with a person or a weight of 75 kg on the driver's seat. The vehicle is otherwise not loaded.
  • No load is required for trucks and other multi-lane vehicles.
  • Single-lane vehicles and single-axle traction or working machines (with seat cart or trailer) should be loaded with a person or 75 kg on the driver's seat.
  • In the case of vehicles with hydraulic or air suspension, manufacturers' instructions must be heeded.
  • If automatic correction of the headlamps or an infinite or multi-stage setting fixture is available, follow the manufacturer's instructions. In this case, various function tests, depending on the manufacturer, must be carried out.
  • A diagnostic tester is required for adjusting various vehicles with automatic illumination range adjustment, since the control unit has to be set to "basic mode" during adjustment. If the cut-off line is set correctly, this value is set as the new control value, Fig. 4.

Setting up the beamsetter

If the floor conditions are suitable and the vehicle has been prepared, the beamsetter still has to be aligned to the vehicle to enable exact adjustment.


The beamsetter is moved in front of the headlamp to be checked. The beamsetter box must be aligned to the middle of the headlamp or to the light source. Vertical and horizontal deviations may not exceed 3 cm. The distance between the beamsetter box and the headlamp varies depending on the manufacturer. For the HELLA GUTMANN beamsetters, the distance between the front edge of the beamsetter box and the headlamp may be between 30 and 70 cm, see Figure 5.


The beamsetter box is then aligned to the vehicle. Devices with a wheel-mounted base must be individually aligned for each headlamp to be checked. For beamsetter devices on rails, the beamsetter box only needs to be aligned once. Using the broad-band, laser, or mirror sight, align the beamsetter box in such a way that the sight line touches two points situated at the same height, symmetrically to the vehicle’s longitudinal axis, see Fig. 5, dashed lines.

Setting the forward inclination of the cut-off line

Finally, set the "forward inclination" on the device. This corresponds to the tilt angle of the headlamp cut-off line. The forward inclination is given in % and can normally be found on the headlamp, see Fig. 6.


For example, 1% means that the low beam is at an angle of 10 cm at a range of 10 m. The aiming screen is set to the correct percentage using the scaled wheel, see Fig. 7.

Table of settings

Here are two tables containing the main setting dimensions for different vehicle types.

Vehicle type:
Motor vehicles, multi-lane, except agricultural or forestry
tractors and working machines, or similar motor vehicles
Setting
Headlamps for low beam Fog lamps
1.1 EEC (EC) / ECE as a basis for testing Setting indicated on the vehicle 2.0%
1.1.1 Motor vehicles with lighting fixture according to 76 / 756 / EEC or with approval according to ECE-R 48
1.2 StVZO (Road Traffic Act) as a basis for testing
1.2.1 Motor vehicles with initial registration as from 01/01/1990. Headlamps not higher than 1,200 mm above the road1)
1.2.2 Motor vehicles with initial registration up to 12/31/1989. Headlamps not higher than 1,400 mm above the road1) and motor vehicles with initial registration as from 01/01/1990. Headlamps higher than 1,200 mm but not higher than 1,400 mm above the road1) 1.2% 2.0%
a) Passenger cars (also combination motor vehicles) 1.2% 2.0%
b) Motor vehicles with level-regulating suspension or automatic tilt compensation of the light beam2) 1.0% 2.0%
c) Trucks with loading area at the front
d) Trucks with loading area at the back, except motor vehicles as per 1.2.2 b) 3.0% 4.0%
e) Truck tractor except motor vehicles as per 1.2.2 b)
f) Buses except motor vehicles as per 1.2.2 b)
1.2.3 Motor vehicles with headlamps H ≤ 1,400 mm1) H/3 (H/3 + 7)
2. Motor cycles and similar motor vehicles    
2.1 93 / 92 / EEC as a basis for testing    
a) 2-wheel mopeds No requirements
b) 3-wheel scooters and 4-wheel light vehicles
c) Motorcycles without/with sidecar 0.5 to 2.5% 2.0%
d) 3-wheel scooters
2.2 ECE-R 53 as a basis for testing Setting indicated on the vehicle 2.0%
2.3 StVZO (Road Traffic Act) as a basis for testing 1.0% 2.0%
3 Agricultural or forestry tractors and working machines, or similar motor vehicles    
3.1 EEC (EC) / ECE as a basis for testing    
a) Headlamp height: 500 mm < h ≤ 1,200 mm 0.5 to 4.0% 2.0%
b) Headlamp height: 1,200 mm < h ≤ 1,500 mm 0.5 to 6.0% 2.0%
c) Additional headlamps (on tractors equipped for front structures) H ≤ 2,800 mm H/3  
3.2 StVZO (Road Traffic Act) as a basis for testing    
a) Single-axle tractors or working machines with permanent low beam headlamps which indicate the required inclination of the light beam center 2 x N 2.0%
b) Multi-axle tractors or working machines 1.0% 2.0%

1) Up to the highest point of the illuminating area.

2) Special features of this equipment must be observed in accordance with the manufacturer's instructions.

CHECKING THE HEADLAMP ADJUSTMENT – SETTING THE LIGHT DISTRIBUTION: INSTRUCTIONS

The device now has an optimal setting and the different light distributions can be checked and corrected if necessary.

HEADLAMPS WITH SYMMETRICAL LOW BEAM

Align beamsetter according to point 4.0. Set the scaled wheel according to the adjustment table.


Turn on the low beam:
The cut-off line must run as horizontally as possible along the dividing line over the whole width of the screen. Correct the headlamp adjustment if necessary using adjusting screws.


Switch on high beam:
The light beam center of the high beam must lie on the central marking; correct if necessary with the adjusting screws.


If the same adjustability is used for both the high beam and low beam headlamps, recheck the low beam.

HEADLAMPS WITH ASYMMETRICAL LOW BEAM

Align device according to point 4.0. Set the scaled wheel according to the adjustment table.


Turn on the low beam:
In the case of headlamps with asymmetrical low beam, the cut-off line must touch the dividing line on the test surface. The kink point between the left and right sloping part of the cut-off line must run vertically through the central marking (upper cross). The bright core of the light beam must be situated to the right of the vertical line running through the central marking. For easier determination of the left headlamp-half of the kink point (viewed from direction of travel), cover and then uncover again several times. Then recheck the low beam.


High beam: In accordance with the prescribed setting of the low beam cut-off line, the middle of the high beam light beam must lie on the center marking (upper cross).

CHECKING THE ADJUSTMENT OF FOG LAMPS

Align device according to point 4.0.


Set the scaled wheel according to the adjustment table.


Turn on the fog light:
The cut-off line must run as horizontally as possible along the dividing line over the whole width of the screen. Correct the headlamp adjustment if necessary using the adjustment options.

SPECIAL HEADLAMPS FOR HIGH BEAM (E.G. AUXILIARY HIGH-BEAM HEADLAMPS)

Align device according to point 4.0.


Set the scaled wheel according to the adjustment table.


Switch on high beam:
The light beam center of the high beam must be on the central marking; correct if necessary using the adjustment option.


In the case of separate high beam modules (e.g. in combination with Bi-Xenon headlights), the high beam should be aimed according to manufacturers' instructions, since different settings are possible in this case.

Adjusting the "glare-free high beam cut-off line"

Some manufacturers have also been offering so-called "high-beam assistants" for some time now as an optional feature. A camera installed in the windscreen recognises when a vehicle is approaching or driving in front of your car and automatically switches the high beam to low. In addition, there is also the so-called "glare-free high beam cut-off line". This high beam system produces a very special light distribution on the road.


In contrast to a normal high beam that is displayed on the aiming screen as an oval spot of light, the shape of the glare-free high beam cut-off line tends to be square, see Fig. 9.


In order to adjust this high beam function, a menu needs to be called up using a diagnostic tester. The headlamps are moved into a certain position and the glare-free high beam cut-off line is activated. Now the vertical line of the light distribution (red circle) must be adjusted exactly to the central marking of the aiming screen. In the case of the glare-free high beam cut-off line, correct adjustment is absolutely essential as otherwise other road users may be exposed to extreme glare.

Checking the glare value of the low beam

After adjusting the headlamps, the luxmeter can be used to check whether the highest permissible glare value of the low beam has been exceeded. Today's beamsetters are generally equipped with a digital luxmeter, see Fig. 10.


If the glare has been clearly exceeded, the headlamp must be replaced so as not to blind other road users.

Headlamp adjustment: Test spectrum

Headlamp adjustment: Test spectrum

PROFESSIONAL HEADLIGHT ADJUSTMENT: VIDEO

Professional headlamp adjustment with HELLA GUTMANN SOLUTIONS

Adjusting a headlamp with the beamsetter (SEG V).


04:39 min

ADJUSTING HEADLAMPS WITHOUT A DEVICE: INSTRUCTIONS

As already mentioned, this method is still mainly used today for vehicles on which the upper edge of the headlamps is higher than 140 cm above the ground. The vehicle is driven on to a level surface, which does not have to be horizontal, to a distance of 10 meters from a vertical, light-coloured wall.


The following lines have to be marked on the wall.


Line A
Extend the longitudinal axis of the vehicle to the test wall and mark it with a vertical line.


Line B and C
Measure the distance X of the vehicle headlamps (centre to centre) and mark it on the wall symmetrically to Line A.

Line D
Draw this line at a distance "e" below Line H.


Line H
Measure the height of the center of the headlamps above the ground and draw the line on the test wall parallel to the ground.

Adjusting the headlamps

Cover the right headlamp and align the left headlamp so that the horizontal part of the cut-off line touches Line D. Then align the headlamp laterally. The kink between the horizontal and the sloping (asymmetrical) part of the cut-off line must lie on Line B. Then align the right headlamp in the same way. In this case, the kink of the cut-off line lies on Line C.

How helpful is this article for you?

Not helpful at all

Very helpful

Please tell us what you did not like.

To get the free HELLA TECH WORLD newsletter.

Many thanks. But before you go.

Sign up for our free HELLA TECH WORLD newsletter to receive the latest technical videos, car repair advice, training course information, marketing campaign details and diagnostic tips.

Show additional information on our newsletter Hide additional information on our newsletter

Register for our free HELLA TECH WORLD newsletter to stay up-to-date with the latest technical videos, car repair advice, trainings, diagnostic tips and marketing campaigns.

Together we can get cars back on the road quickly!

Please note:
You will only be subscribed to the newsletter once you have clicked on the confirmation link in the notification e-mail you will receive shortly!

Data Protection | Unsubscribe

Please note:
You will only be subscribed to the newsletter once you have clicked on the confirmation link in the notification e-mail you will receive shortly!

Data Protection | Unsubscribe

Almost there!

All you need to do is confirm your sign up!
We've sent an e-mail to your email address.

Check your inbox and click on the confirmation link to start receiving HELLA TECH WORLD updates.

Wrong e-mail or no confirmation received?
Click here to enter it again.

SIGN UP NOW!

To get the free HELLA TECH WORLD newsletter.

Show additional information on our newsletter Hide additional information on our newsletter

Register for our free HELLA TECH WORLD newsletter to stay up-to-date with the latest technical videos, car repair advice, trainings, diagnostic tips and marketing campaigns.

Together we can get cars back on the road quickly!

Please note:
You will only be subscribed to the newsletter once you have clicked on the confirmation link in the notification e-mail you will receive shortly!

Data Protection | Unsubscribe

Please note:
You will only be subscribed to the newsletter once you have clicked on the confirmation link in the notification e-mail you will receive shortly!

Data Protection | Unsubscribe

Almost there!

All you need to do is confirm your sign up!
We've sent an e-mail to your email address.

Check your inbox and click on the confirmation link to start receiving HELLA TECH WORLD updates.

Wrong e-mail or no confirmation received?
Click here to enter it again.