Repair note for brake caliper Teves floating-type caliper series FN Removing and installing disk brakes | HELLA PAGID
General information
Since this kind of floating-type caliper brakes are installed in many modern vehicle models, these repair notes can also be applied to other vehicle models with identical brake calipers.
The schematic illustrations, pictures and descriptions are for explanation and presentation of the document text only, and cannot be used as the basis for carrying out the repair.
The following repair note uses the example of a BMW 320i (E90).
Repair note
Repair work to brake systems may only be carried out by qualified specialists.
When carrying out any repairs on the brake system, you must follow the maintenance and safety instructions of the vehicle manufacturer and the product-specific assembly instructions.

Preparatory work
Before carrying out the repair, it is recommended that all relevant components in the area of the axle suspension and wheel brake such as e.g. tires, brake hoses and transverse control arms are checked for damage.
- Drive the vehicle onto a lifting platform
- Remove the front wheels
- Carry out a visual inspection
- Defective parts must be replaced without fail.

Repairs
Remove the housing retaining spring.
· Push the retaining spring in the direction of the arrow against the spring force and remove sideways
· Check the retaining spring for damage and replace if required.
Warning:
The retaining spring is preloaded.
If it jumps sideways it can cause injury.
When repairing the brakes of vehicles that are more than 48 months old, we also recommend that you replace the retaining spring.

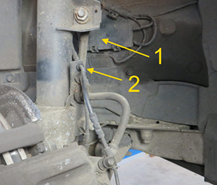
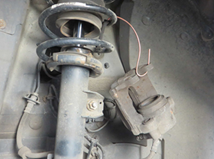
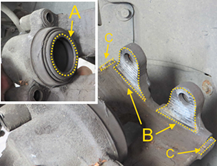
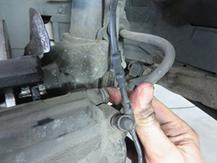
Unclip the wiring harness of the brake pad wear indicator.
· To do so, open the connector housing (1) in the wheel well, release the connector and detach the wiring harness at the combination holder (2).
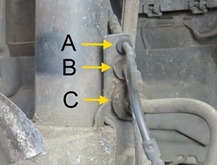
Note:
The following component connections are securely fixed in the combination holder on the suspension strut:
· Connecting cable of brake pad wear indicator (A)
· ABS sensor connecting cable (B)
- Brake caliper hose (C)
Remove both protective plugs of the guide bolts
Inspect protective plugs and damping sleeves for damage
· Defective parts must be replaced
Note:
The guide bolts can corrode as a result of water and dirt ingress, which can lead to impairment of the function of the brake caliper.
This can be a possible cause of imbalanced braking performance or premature wear.
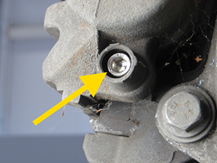
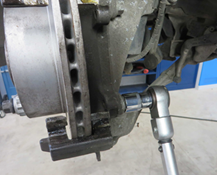
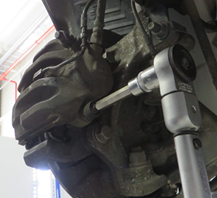
Undo and remove the two fixing bolts (guide bolts).
Required tool: 7 mm Allen key
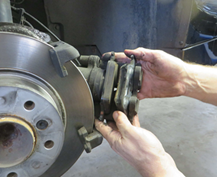
Remove the brake caliper from the caliper anchor bracket
- Pull the brake caliper back and off.
- Then remove the outer and inner brake pads from the brake caliper.
Note:
Compare the wear pattern of the brake pads. Brake pads that exhibit unevenly and heavily worn linings indicate a defect in the function of the brake caliper.
Tie up the brake caliper on the suspension strut using a suitable hook.
- In doing so, avoid twisting or kinking the brake hose
- Detach the brake hose at the holder on the suspension strut if necessary.
Note:
To avoid damage, do not leave the brake caliper hanging from the brake hose!
Slacken and unscrew both fixing bolts of the caliper anchor bracket
· Remove the caliper anchor bracket and check for damage.

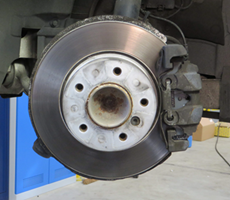
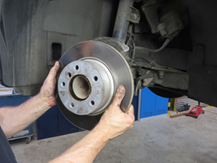
Removing the brake disc
· Undo the fixing screw
· Remove the brake disc
Note for loosening the brake disc.
If the brake discs are sticking, carefully tap the bottom of the brake disc pot with a rubber hammer.
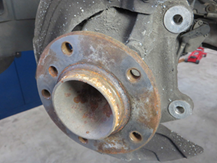
Check the wheel hub.
· Check surface for corrosion and damage
· Check thread for damage
· Turn the wheel hub and check wheel bearing for smooth running and play.
>
Clean the contact face of the wheel hub with a suitable tool.
- Remove soiling and signs of corrosion.
Note:
Unevenness of the contact face can lead to warping of the brake disc and therefore axial runout!
The contact face of the wheel hub must be undamaged, rust-free, clean and bright. To protect against corrosion, apply a thin coating of spray oil to the contact face then wipe off with a lint-free cloth.
Note:
Do not excessively grease the surface of the wheel hub after cleaning!
· The grease could come into contact with the brake as a result of rotation.
- This could have an effect on the attachment of the wheel or the tightening torque of the wheel bolts.
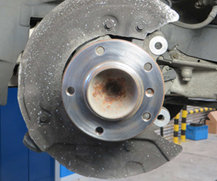
Mount the brake disc and fasten with locating screw.
Note:
Observe the tightening torque!

Preparing the brake caliper anchor bracket for assembly
The recommended way to do this is to remove the anchor bracket and clamp it in a vise.
· Clean the anchor bracket with brake cleaner
· Carefully remove any corrosion on the guide surfaces using a wire brush or file
Warning:
It is essential to avoid mechanical damage to the guide surfaces!

Installing the brake caliper anchor bracket
· Insert screws and tighten
Observe the tightening torque!
Finally, apply a thin coating of non-conductive, non-metallic anti-squeal paste to the clean contact faces of the caliper anchor bracket.
Note:
Before greasing, place the new brake pads in the caliper to check their freedom of movement and their fit with respect to the contact faces.

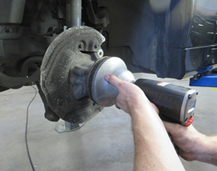
Push the brake piston right back using the reset tool.
· Check that the dust protection boot of the piston is seated correctly and is free of damage.
Note:
Observe the brake fluid level in the expansion tank when pushing back the piston.
Drain the tank beforehand if necessary.

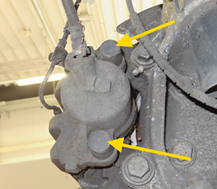
Clean the brake caliper with brake cleaner.
· Thinly coat the contact face (A) of the brake piston with anti-squeal paste.
· Clean the contact face (B) and also thinly coat with brake paste.
· Clean the contact face (C) of the hammer heads / brake calipers and thinly coat with anti-squeal paste.
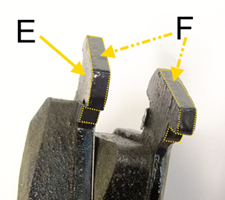
Installing the brake pads.
Apply a thin coat of non-metallic, long-lasting lubricant to the new brake pads only at the hammer head (E) in the area of the contact faces (F) on the brake caliper.
· Insert the outer brake pad in the caliper anchor bracket
· Insert the pad on the piston side in the brake caliper.
· Fit the brake caliper on the caliper anchor bracket.
Note:
New brake pads may only be installed if the brake disk is thicker than the minimum brake disk thickness (MIN TH).
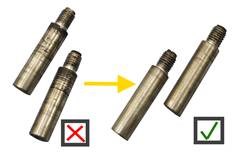
Clean the guide bolts and check them for damage.
· Check the threads
· Damaged bolts must be replaced
After cleaning, grease the contact surfaces of the guide bolts with a thin coating of grease. Only use a silicon-based grease in this area.
Caution!
The dust protection boot of the brake piston and the
protective plugs and damping sleeves of the caliper guide must not come into contact with mineral oil-based oils or greases. They could be damaged due to swelling of the elastomers.

Mount the brake caliper and fasten with the guide screws.
· Reattach the brake hose and wear indicator cable in the combination holder
· Insert the retaining spring
Note
Observe the tightening torque!
Install and connect a new brake pad wear indicator
· Make sure the wear indicator is seated correctly in the brake pad
Clip the cables and brake hose back into the combination holder.
Note:
Make sure that the brake hose is not twisted and is correctly fastened in the holder.
Press the brake pedal several times up to a maximum of two thirds of the way down so that the brake pads and pistons reach their working position.
Note:
If you press the pedal down fully, this can damage the brake master cylinder!

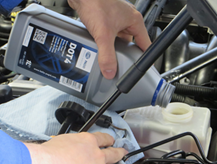
Check the brake fluid level in the expansion tank and fill up to the "MAX" mark if necessary
· Change the brake fluid if necessary
Note:
Only use new brake fluid that has been approved for the vehicle type.
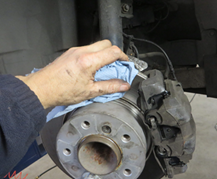
Clean the brake disc after mounting the brake caliper.
· The friction ring must be free of dirt and grease.
· The disc pot and thread must be clean and free of foreign particles.
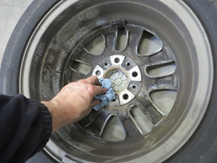
Mounting the wheels.
· Clean the rim contact face before mounting the wheel
Observe the tightening torque of the wheel bolts!
Service reset
Once the brake pad and wear indicator have been replaced, the Condition Based Service indicator must be reset using a suitable diagnostic unit as specified by the vehicle manufacturer.
Info:
The CBS maintenance system analyses the actual service requirement of the vehicle. It measures the condition of the most important wear parts and operating fluids and monitors the individual service scopes.

Function check and test drive
Once the repair has been carried out, it is essential to perform a functional check of the brake system.
· Carry out a test drive to run in the brake system according to the specifications of the vehicle manufacturer
· Check the function of the brake system on the brake test stand

Additional information
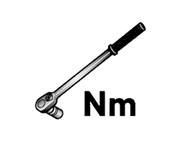
Tightening torques:
Example vehicle BMW E90 / 320i / N46
Tightening torques of the wheel brake on the front axle
· Bolt, brake disc on wheel hub (16 Nm)
· Bolt, M 12x1.5 on brake anchor plate (110 Nm)
· Guide bolt, brake caliper / hexagon socket wrench size 7 (30 Nm)
- Wheel bolt (120 Nm)
Other testing options:
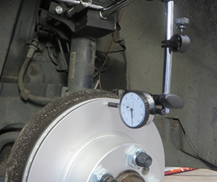
In order to prevent in advance the problem of brake judder when driving, the axial runout of the new brake disc should be tested using a suitable dial gauge in accordance with the specifications of the vehicle manufacturer.
If the tolerance values are not attained, the wheel hub and the wheel bearing must be checked.
Other helpful content can be found in the technical information:
- "Checking the lateral runout of the brake disc"
- "Checking the lateral runout of the wheel hub"
We recommend you use the following products in order to carry out the repair safely:
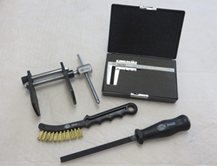
Tools:
· Brake disc vernier caliper - 8PE 355 290-001
· Brake caliper brush -8PE 355 290-031
· Brake piston pressure tool - 8PE 355 290-081
· Brake caliper file - 8PE 355 290-091
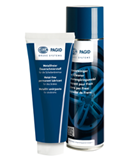
Cleaning and lubrication agents:
· Brake cleaner - 8DX 355 370-001 / 500 ml
· Non-metallic permanent lubricant for disk brakes - 8DX 355 370-011 / 75 ml
- Brake fluid -8DF 355 360-021 / 1 l
Important safety note
Not helpful at all
Very helpful