
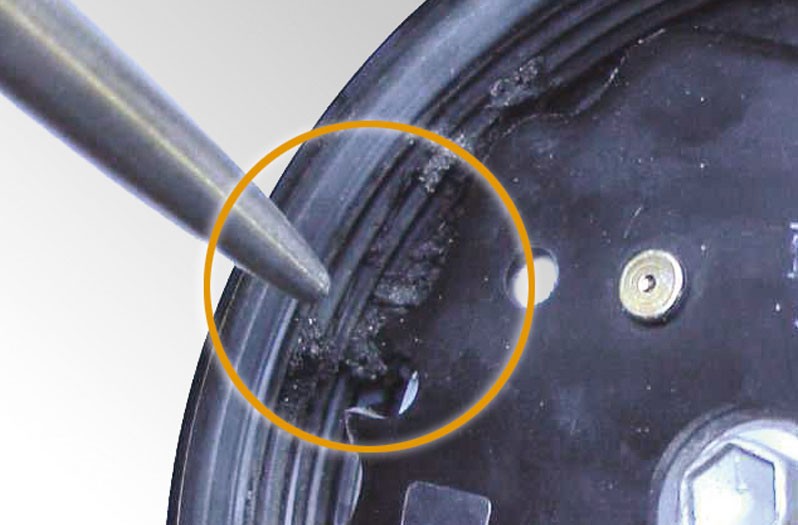
Rubber abrasions are visible on the inside of the pulley (Fig. 3). The compressor shaft is no longer being driven. The pulley or rubber element can be replaced if the compressor can be easily turned.

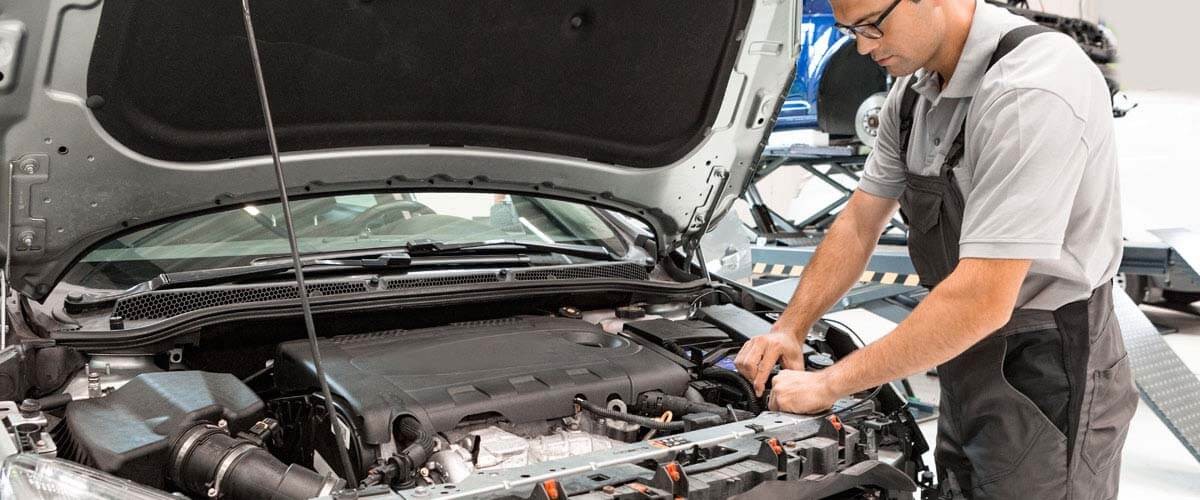
The air conditioning compressor isn't just the heart of the air-conditioning system, it's also the component which is placed under the greatest strain. This page explains how the air conditioning compressor works and why it could fail. You will also find out how to diagnose faults and key points to note when replacing the air conditioning compressor in order to avoid consequential damage.
For some years now, so-called "clutchless", externally controlled, variable compressors have been in use. All reputable compressor manufacturers use a wide range of basic types. The most common types on the market are listed here: Denso, with types 6SEU and 7SEU; Sanden, with types PXE 13 and PXE 16. However, Delphi/Harrison is also represented with the CVC7 series, which is very similar to the design of the V5 compressor. This generation of compressors is used by almost all vehicle manufacturers (Audi, BMW, Citroen, Seat, VW, Opel....).
Externally controlled means that the displacement of the compressor is determined via a built-in control valve controlled by the air-conditioning control unit, depending on the most diverse system parameters, such as outside/desired temperature, high/low pressure, speed or engine load. "Clutchless" means that the compressor no longer has an electromagnetic clutch. And this in turn means that the compressor is permanently driven via the pulley and works even when the air-conditioning system is switched off. However, the performance is then reduced to just a few %.
The pulleys and their rubber elements designed as "overload protection" are constructed differently, depending on the type of compressor. And depending on the particular type, different methods can be used to determine whether the "overload protection" has been triggered:
Rubber abrasions are visible on the inside of the pulley (Fig. 3). The compressor shaft is no longer being driven. The pulley or rubber element can be replaced if the compressor can be easily turned.
The overload protection has triggered the drive plate (Fig. 4). The drive plate or rubber element can be individually replaced. Prerequisite: Compressor can be turned easily.

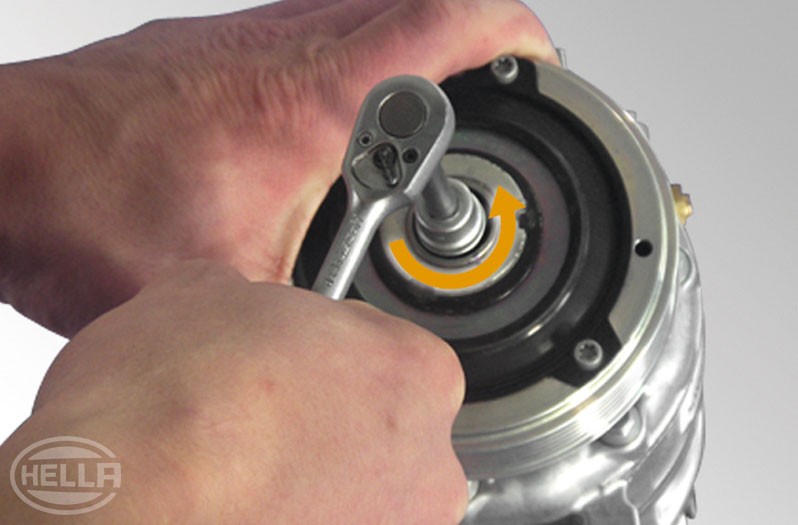
A triggered torque limiter cannot always be visually noticeable. In order to check whether the limiter has triggered, the compressor shaft is to be held with a suitable tool (Fig. 5) and the pulley turned to the left at the same time. If the pulley can be turned to the left, the limiter has triggered and the compressor must be replaced. It is not possible to replace the torque limiter on Sanden PXE 13 and PXE 16 compressors.
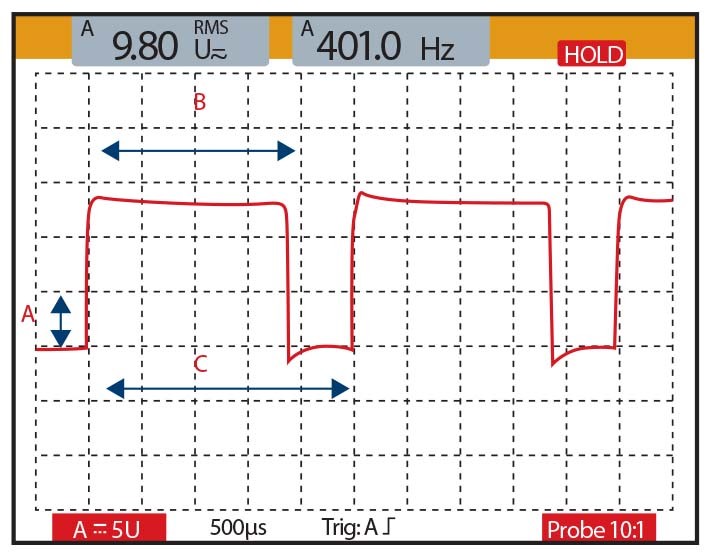
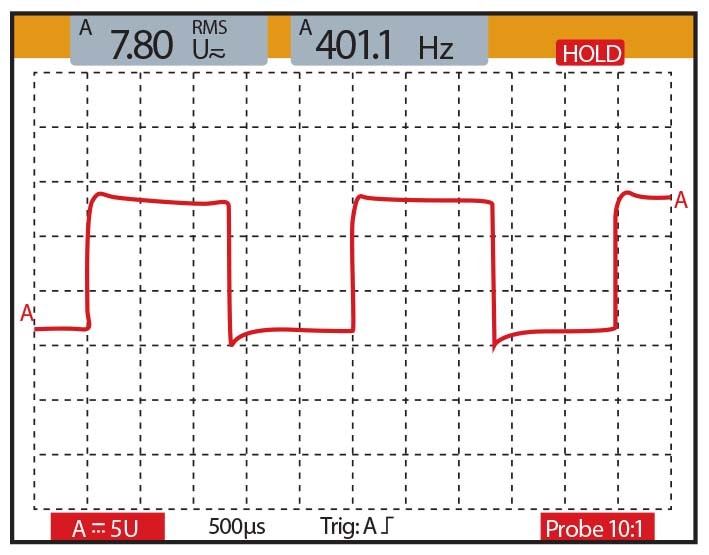
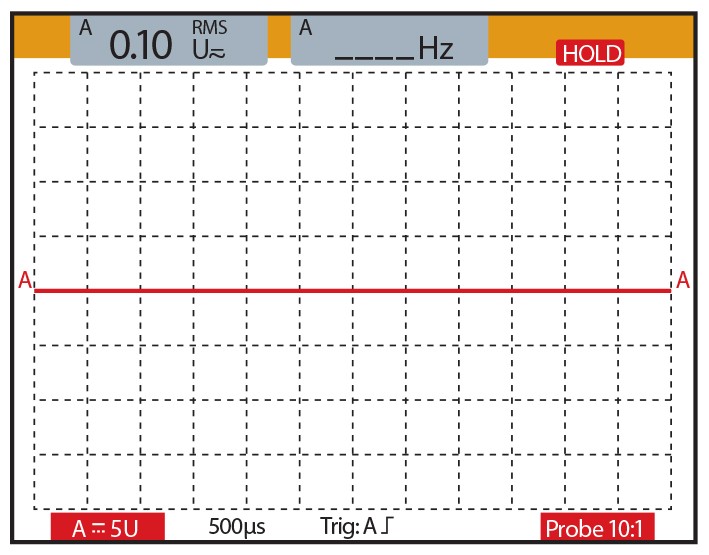
The maximum current sent from the control unit to the control valve is approx. 0.65 A in the Audi A3, for example, at the lowest temperature setting. This is also when the compressor reaches its maximum output. During normal operation, an average current of 0.3 A flows. The problem with newer vehicles, however, is that diagnosis outside the engine management area is not yet possible with many test devices. The use of an oscilloscope is ideal here. With the aid of suitable test probes, the PWM signal can be recorded at the plug connection of the compressor.
Compressors are often the subject of premature complaints in connection with noises and other problems associated with the air-conditioning system. In many cases, it turns out that the compressor is OK or that the cause of the fault does not actually come from the compressor itself. For this reason, all components of the system should always be included as the cause of the fault. Noise can be caused not only by the compressor, but also by its mounting, the drive, the expansion valve or piping and cabling. The wrong amount of refrigerant can also be responsible for various noises.
Furthermore, the oil provides important information about any possible damage:
As the system oil quantities are becoming smaller and smaller (sometimes only 80 ml), monitoring and maintaining the oil quantity (e.g. when servicing the air-conditioning system and replacing components) are of the utmost importance.
Repair of clutchless compressors is only possible to a limited extent. And it must always be carried out with the aid of suitable tools and repair information and instructions.
It goes without saying that the assessment of the system pressures is of particular importance in the diagnosis. The default values provided by the vehicle manufacturer should be used in such instances. This also applies to the discharge temperature.
Points of reference for the assessment of the system pressures can be derived from the table below:
| Assessment of the system pressures | ||||
| High pressure | Low pressure | Symptoms | Possible cause | Potential solution |
| Normal | Normal | → Outflowing air does not get cold | → Too much oil in the air-conditioning system → Air or moisture in the air-conditioning system | → Vacuum, flush and refill the air-conditioning system with oil and refrigerant → Vacuum the air-conditioning system, replace and refill the dryer |
| High | High | → Low pressure line colder than evaporator → High pressure decreases when the capacitor is cooled with water → High and low pressure balance themselves out as soon as the compressor switches off and pulsate as soon as it switches on | → Expansion valve open too wide → Too much refrigerant in the system → Capacitor dirty/blocked → Fan problems → Problem with the compressor (outlet valve/sealing) | → Replace expansion valve → Vacuum and refill air-conditioning system → Check and clean/replace capacitor → Check fan → Check compressor, replace if necessary |
| Low | Low | → Outflowing air does not get cold → Suction line is colder than the evaporator | → Too little refrigerant in the system → Blockage on the suction side | → Vacuum and refill air-conditioning system → Check pipework and connections, replace if necessary |
| High | Low | → Ice formation on the liquid line → Ice formation on the dryer | → Line/dryer blocked | → Check dryer/line, replace if necessary |
It is essential to observe the following points when troubleshooting noise sources and prior to replacing the compressor:
Check all retaining clamps and fixing points for breaks or cracks and any missing nuts or bolts.
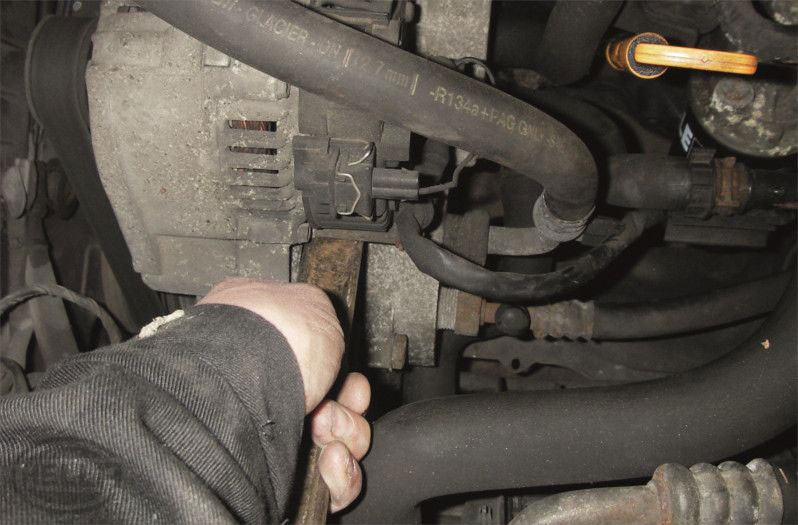
Any vibration resulting from this may be the cause of excessive compressor noise. Observe whether the noise changes if you apply force onto the retaining clamps or fixing points using an assembly lever, for example (Figure 1). If the noise changes, the noises are most likely not being caused by the compressor.

Check the hoses and lines to determine whether vibrations from the engine or pulsing refrigerant are being transmitted to the vehicle interior.
For this purpose, hold them with one hand and observe possible changes in the noise (Figure 2).
Check the V-belt, clamping device, tensioner pulleys, alternator freewheel clutch, and pulleys for smooth running, play, and alignment.
Excessive tolerances caused by worn parts can cause noise.
Excessive high pressure (Figure 3) can cause unusual compressor noises.
If the high pressure service connection is located behind a blockage in the system, the high pressure may be higher than that indicated on the manometer. In order to diagnose such a problem, it is useful to measure the temperatures at the condenser.
Excess or contaminated refrigerant causes excessive high pressure, which, in turn, may cause compressor noise.
The same applies to refrigerant where the content of non-condensable gases (air) is too high.
The condenser can also be considered a cause of unusual noise.
If insufficient air is routed through the condenser, the refrigerant cannot sufficiently condense and the high pressure increases excessively. This can result in unusual noises. Therefore, check whether the fan(s) transport(s) sufficient air through the condenser. Check the condenser and radiator fins for possible contamination as well (Figure 4).
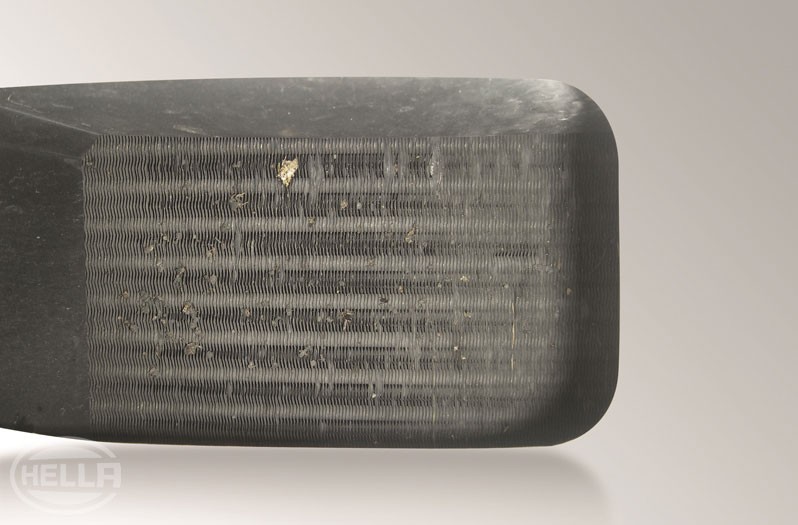
Noise can often also be caused by contaminated expansion valves (Figure 5) or throttle valves.
This can be caused by contamination in the form of metal abrasion, for example. This reduces the refrigerant flow and causes excessive high pressure. "Defective" expansion valves can generate various buzzing, whistling, or droning noises, for example, which are clearly audible in the vehicle interior.

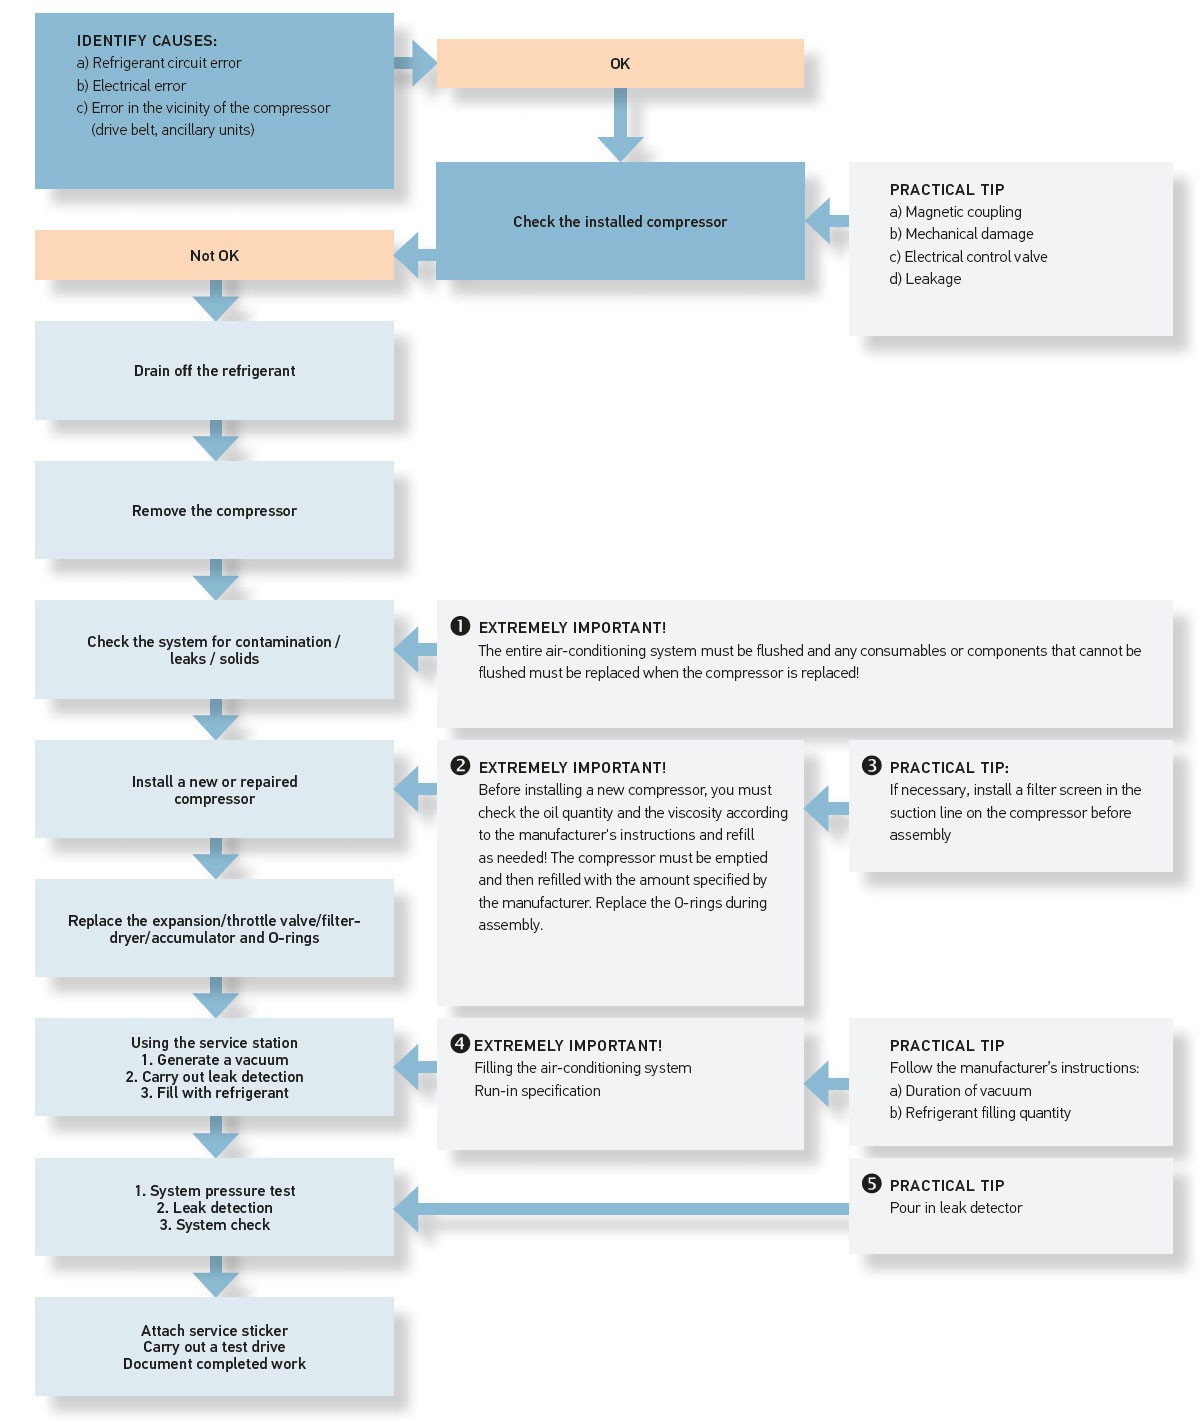
Particles of dirt in the air-conditioning circuit can only be removed by flushing the entire system thoroughly. Depending on the contamination level, refrigerant R134a or a special flushing solution, as provided by Hella Gutmann Solutions, are suitable for flushing. Compressors, dryers (accumulators), expansion valves, and throttle valves cannot be flushed. Since system contamination (abrasion, chips) must always be assumed in the case of a compressor defect and cannot be ruled out, it is absolutely essential that the system be flushed when replacing this component.
Follow the manufacturer’s instructions and instruction leaflets/note the viscosity.
1. Distribution of the oil
There is refrigerant oil in every component of the air-conditioning system. The oil is removed with the replaced component during repairs. It is therefore essential to refill the appropriate quantity of oil. The graphic on the right shows the average distribution of the quantities of oil within the system.
2. Observe the quantity and specification of the oil
Before mounting a new compressor or when
refilling refrigerant oil
, always check the oil quantity and the viscosity in the vehicle manufacturer’s instructions.
3. Correct quantity of system oil in the compressor
As one and the same compressor can potentially be used for different vehicles or systems, it is essential that the oil filling quantity be checked/corrected before mounting the compressor. For this purpose, all the oil must be siphoned off and collected. The compressor must then be refilled with the entire oil quantity specified by the vehicle manufacturer (system oil quantity). To ensure that the oil is distributed equally, the compressor must be turned 10 times by hand before installation. This also corresponds to
the instructions from the compressor manufacturer Sanden; specifications from the vehicle manufacturer must be observed separately in each case.
Every air-conditioning system must be flushed when the compressor is replaced in order to remove contamination and foreign bodies from the system. If there is still contamination in the circuit despite flushing, damage can be prevented by the use of filter screens in the suction line.
Run-in specification for the compressor:
Compressor damage is also caused by a lack of refrigerant. It is therefore recommended that the air-conditioning system be maintained regularly and that contrast agent be added to the system if necessary. There are various methods of doing this, Document the use of contrast agent in the vehicle. This prevents the system from being overfilled – in extreme cases, overfilling could damage the compressor.