Damage patterns on starters – recognising causes, avoiding failures

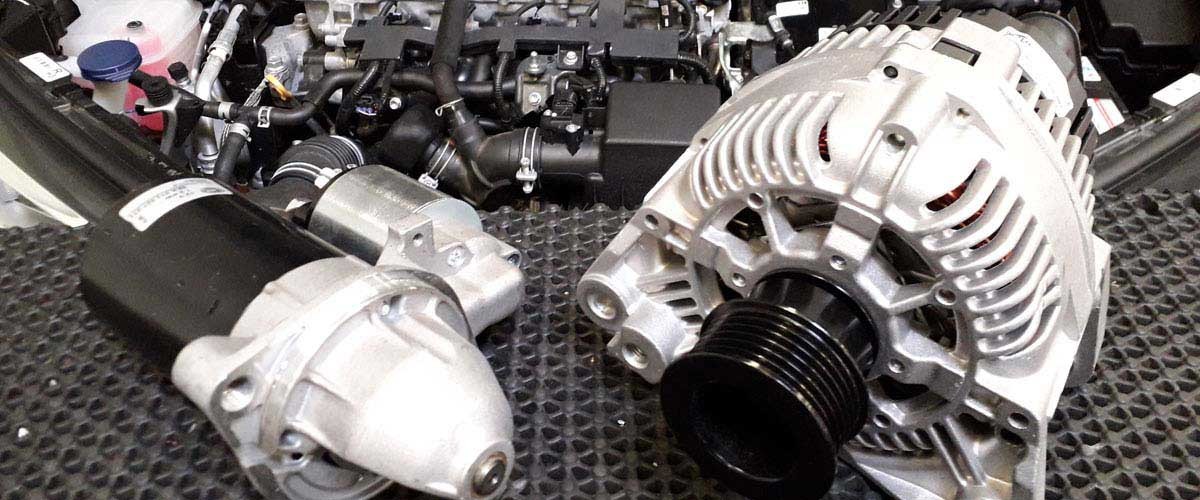
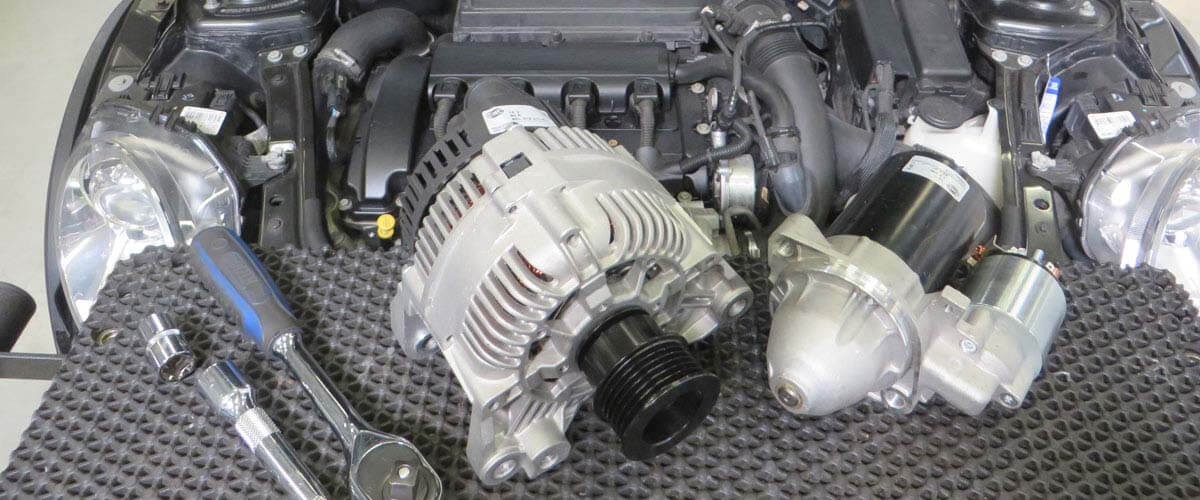
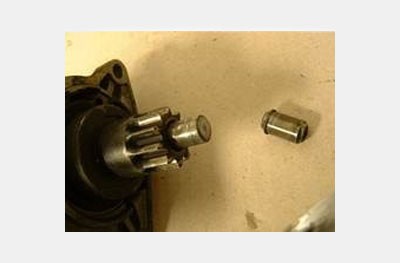
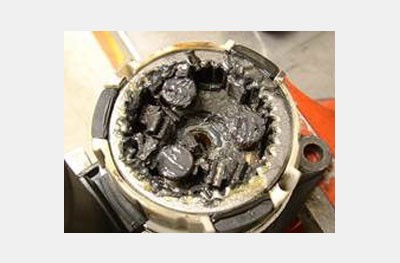
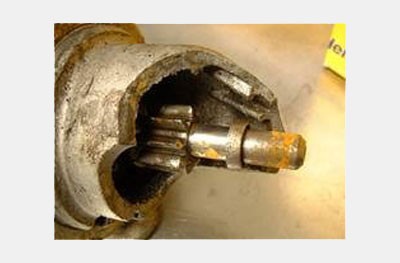
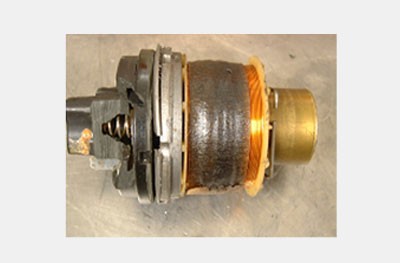
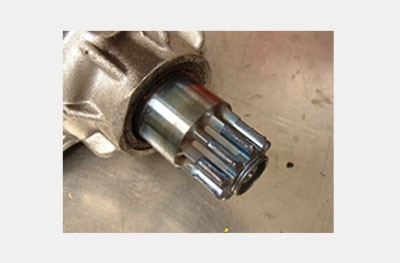
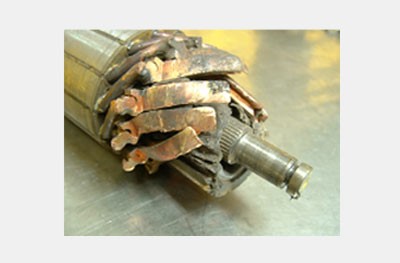
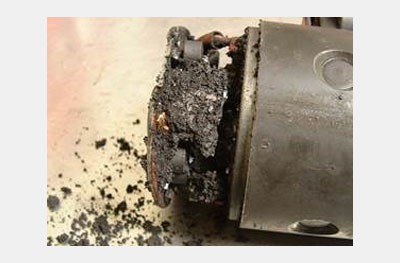
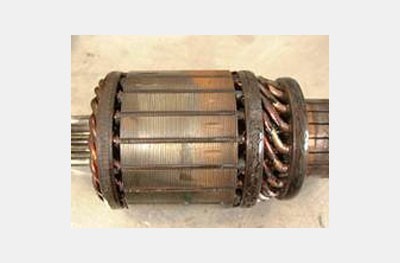
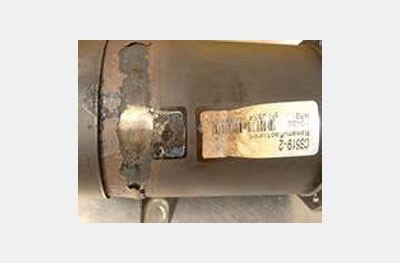
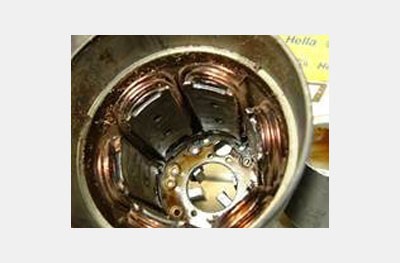
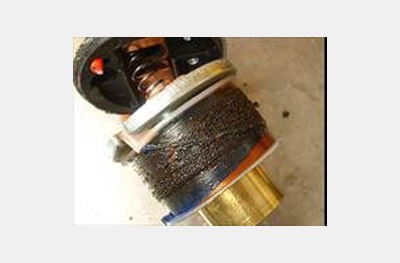
The starter, also known as the starter motor, is one of the central components in the starting and charging system. A failure can have all kinds of consequences: ranging from starting difficulties right up to the vehicle coming to a complete standstill.
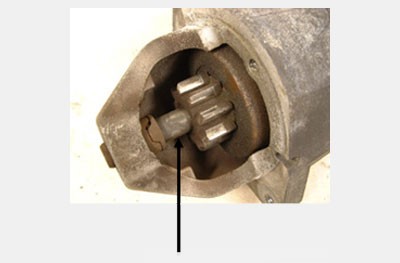
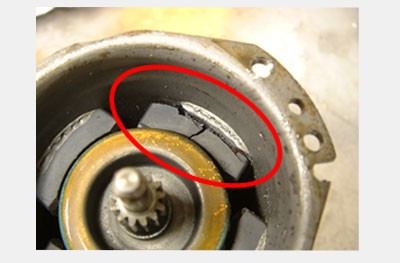
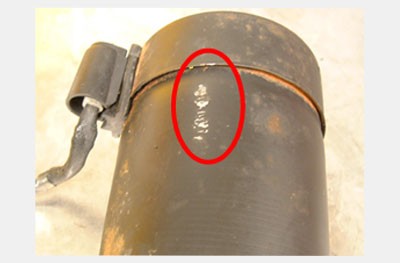
If the starter does not turn, the direct cause of the fault is usually the starter itself, provided that the other components of the starting system are working properly. However, damage is often caused by external influences such as dirt, moisture, mechanical stress or incorrect operation. These factors can affect the starter to such an extent that it eventually fails. If such influences are recognised and rectified at an early stage, repeated failure can be avoided.

Important safety information

The following technical information and practical tips have been compiled by HELLA in order to provide professional support to vehicle workshops in their day-to-day work. The information provided on this website is intended for use by suitably qualified personnel only.  

Starter damage assessment

Deposits caused by "pasting"

A so-called pasting or "clogging" of the starter often becomes noticeable when there is an increased build-up of noise and the starter pinion is damaged. In severe cases, the motor ring gear can also be affected.

Cause:
During operation, dust and abrasion particles from the clutch, for example fine clutch dust or small dirt particles from the surrounding area, enter the clutch housing. Once there, these particles combine with the lubricating grease on the armature shaft, the counter shaft, the steep thread and in the one-way clutch. The result is a viscous mass that loses its lubricating ability.

Effects:
this mass severely restricts the manoeuvrability of the freewheel gearbox and the steep thread. The result is that the starter pinion disengages too slowly from the motor ring gear, a situation which can lead to tooth damage and noise build-up. In many cases, the starter then has to be replaced.

Practical tip:
only suitable greases or those greases approved by the manufacturer should be used for installation. It is also important to ensure that all cover plates and sealing plugs on the clutch housing are present and correctly mounted. When a starter motor is being replaced, we recommend a thorough cleaning of the clutch housing in order to prevent it from becoming "pasted" again.

Damaged ferrite magnets

In some starter types, the copper or aluminium field windings are replaced by ferrite magnets. Broken ferrite magnets or those that have detached themselves from the housing are a damage pattern that occurs frequently with this type of design.

Cause:
Ferrite magnets are brittle and react sensitively to impacts. If the starter housing or the solenoid switch is knocked in any way during functional tests, the magnets may detach themselves from the housing or simply break up. Impacts during installation or removal can also lead to such damage.

Effects:
destroyed or loosened ferrite magnets usually lead to complete failure of the starter. The magnetic fields required for operation can no longer be built up so that the starter motor no longer turns.

Practical tip:
care must be taken when handling starters with ferrite magnets. Functional tests should not be carried out using any kind of hammer blows to the housing. During removal and installation, the starter must be supported and moved in such a way that no hard impact is brought about.

Broken armature shaft

A broken armature shaft on the starter is one of the most serious types of mechanical damage and usually occurs together with other defects. The freewheel, the planetary gearbox and the bearing bell are also frequently affected.

Cause:
Misfiring and kickbacks, for example because of misaligned ignition or incorrectly set injection timing, can occur during the starting process. This means that a sudden, opposing force impacts on the starter. The freewheel is loaded in the locking direction and transmits the force to the housing via the armature shaft. These strong, sudden loads can lead to overstraining of the components.

Effects:
in addition to breakage of the armature shaft, subsequent damage such as destroyed freewheels, damaged planetary gears or cracked bearing bells can also occur. This can result in significant noise development or even complete failure of the starter.

Practical tip:
in order to avoid setbacks and the resulting damage, the ignition and injection system should always be set correctly. Defective components such as ignition coils or spark plugs should not be left in the engine for long periods of time, as they too, can also cause misfiring. Regular maintenance and checking of these systems help to prevent subsequent damage to the starter.

Overrun starter

A runaway starter is when the starter does not disengage in time after the engine starts and continues to run. In this state, the starter is subject to high mechanical and thermal loads, a situation which can, after a short time, lead to considerable damage.

Cause:

The cause of a runaway starter can be traced back to control problems or technical defects. Common triggers can be a jammed ignition or starter switch, a stuck solenoid switch or short circuits in the wiring. Prolonged actuation of the starting process can also result in the starter remaining electrically controlled after the engine has started.

Effects:
if the starter remains engaged with the motor ring gear after the engine has started, it rotates at a significantly higher speed than in normal starting mode. This excessive speed can lead to high mechanical and thermal stress. The resulting centrifugal forces can cause individual fins of the commutator to bend outwards or detach themselves. Then in conjunction with the high heat build-up, damage to the windings, commutator and carbon brush bracket often occurs. Overheated bearings and discoloured coil insulation on the engaging relay are further possible signs. In severe cases, the freewheel overloads, housing parts become deformed and the starter motor fails.

Practical tip:
if ignition or start switches, solenoid switches or the wiring show signs of a defect, they should be repaired or replaced as soon as possible. The starter should only be operated until the engine is properly up and running. Avoid restarting the engine while it is actually running.

Oil-contaminated starter

Oil contamination on the starter motor is often a gradual process. The first signs often go unnoticed until either starting problems or indeed a total failure occurs.

Cause:
Oil contamination on the starter motor occurs when engine oil escapes as a result of leakages and then enters the housing. Typical causes are a defective crankshaft oil seal, leaking valve cover seals or other kinds of housing seals. The oil can penetrate directly into the starter or can also be hurled into the housing by rotating components. There it is deposited on components such as the bearing bell, armature or carbon brushes.

Effects:
if oil penetrates the starter motor, the carbon brushes soften and increased abrasion occurs. The abrasion debris combines with the oil to form a conductive mass, which can cause short circuits and contact problems. This significantly reduces the starter's performance until it finally fails completely.

Practical tip:
leaks in engine components such as the crankshaft oil seal or valve cover seal should be promptly repaired as soon as the first signs of trouble are noticed. After a starter motor has been replaced, we recommend a thorough cleaning of the area where the starter motor was installed to prevent any renewed oil contamination.

Overloaded starters

An overload of the starter is often indicated by discolouring on the armature, burnt field windings or discoloured solenoid switch coils. Such characteristics are a clear indication of a high thermal load.

Cause:
Starters are generally designed for short-time operation only. If they are operated for a longer period of time, for example because the engine starts poorly or does not start at all, the temperature inside quickly rises sharply. Possible triggers are incorrect adjustment of the ignition or injection system, faults in the fuel supply or mechanical defects in the engine.

Effects:
the resulting overheating can damage or burn the insulation around the windings. This can, in turn, result in short circuits, which usually cause the starter to fail completely.

Practical tip:
the starter should only be operated until the engine is properly up and running. If the attempt to start the engine fails, it is advisable to try the starter again but only after a short cooling phase. The cause of the poor starting behaviour should be determined and rectified promptly in order to avoid subsequent damage to the starter.


Broken end shield

A broken end shield on the starter motor constitutes serious mechanical damage. Other components are often also affected, as the end shield ensures stable mounting and precise guidance of the pinion shaft.

Cause:
Breakage of the end shield can be caused by high force acting on the pinion and the pinion shaft. This can be triggered by damage or irregularities on the motor ring gear, for example missing or damaged teeth or significantly increased play. Installation-related tension in the starter motor, for example caused by a missing or damaged centring bush or unevenly tightened fastening screws, can also lead to uneven force distribution. These additional loads can facilitate cracks and fractures on the end shield.

Effects:
if the end shield breaks, the pinion shaft is no longer guided in a stable way. This can lead to misalignments and uneven power transmission in the starter. As a result, the armature and windings inside the starter can start to grind, a development which can lead to severe mechanical damage, increased heat generation and ultimately to complete failure of the starter.

Practical tip:
when installing the starter, ensure that it is correctly centred and that the fastening screws are evenly tightened. Damaged or missing centring bushes should be replaced. The motor ring gear should be checked for damage. This prevents tension and uneven loads, issues which can cause the end shield to break.

Damaged pinion on starter

A damaged pinion on the starter is a possible mechanical defect. The first signs are starting problems, unusual noises or an incorrectly engaging starter. As the pinion provides the friction-locked connection between the starter and the motor ring gear, damage to it can significantly impair the starting process.

Cause:
A damaged pinion can be caused by repeated starting attempts without the engine beginning to run, faulty starter control or incorrect alignment with the motor ring gear. A worn or damaged ring gear can also cause damage. In addition, components such as screws, springs or parts of the clutch can loosen and get caught between the ring gear and pinion during the starting process. Such foreign bodies cause severe mechanical overload, which can even lead to the pinion breaking.

Effects:
a damaged pinion no longer meshes correctly with the motor ring gear. This can lead to false starts, rattling noises during the starting process and, in many cases, to further damage to the ring gear. In addition, discolouring can occur on the pinion and pinion shaft, which indicates a high thermal load.

Practical tip:
before installing a new starter motor, the motor ring gear should be checked for damage and replaced if necessary. Foreign bodies should be completely removed. If, for example, screws or other foreign objects are responsible for the pinion damage, the cause of such damage is also to be determined and accordingly rectified.

Battery plus (B+) connection terminal corroded

Corrosion on the starter's B+ connection terminal is a gradual process that often goes unnoticed for a long time. The first signs usually appear in the form of starting difficulties or voltage drops under load. As the B+ connection terminal ensures the main power supply between the battery and starter, any damage or considerable contamination present here can bring about increased contact resistance.

Cause:
Corrosion on the B+ connection terminal is usually caused by the ingress of moisture or road salt, often in conjunction with damaged or missing protective caps. Loose or incorrectly tightened nuts or screws on the connection can also facilitate oxidation processes. Over time, contact resistance increases, which further heats up the contact surface and accelerates the progress of corrosion.

Effects:
a corroded B+ connection terminal can lead to increased contact resistance and thus to voltage drops under load. This can manifest itself in prolonged starting processes, jerky spinning of the starter or complete inability to start. The additional heating at the contact point can damage the insulation and impair the connection terminal itself. In severe cases, the connection material may melt, resulting in interruptions in the main power supply and total failure of the starter.

Practical tip:
damaged or missing protective caps should be replaced in order to prevent the ingress of moisture and dirt. If corrosion is detected, we recommend thoroughly cleaning the contact surface or replacing the affected components. The contact point should then be protected against renewed corrosion with suitable contact protection grease.

Battery plus (B+) connection terminal melted

A melted B+ connection terminal on the starter is a clear sign of a defect in the main power supply. As a result of the high currents during the starting process, increased contact resistance can already begin to make the contact point heat up considerably. If the heat build-up goes unnoticed, the connection material can melt, often with subsequent damage to adjacent components.

Cause:
A melted B+ connection terminal can be caused by a loose or incorrectly tightened screw connection. The resulting increased contact resistance can lead to the starting current no longer being able to flow unhindered. This faulty connection facilitates thermal overload, especially at high currents during the starting process.

Effects:
a melted B+ connection terminal interrupts or impairs the main power supply between the battery and starter. This can lead to voltage drops, prolonged starting processes or complete inability to start. A frequent result of this is damage to the insulation of adjacent cables and components. In severe cases, a complete replacement of the affected wiring harness or starter is necessary.

Practical tip:
when connecting the B+ cable, ensure the presence of correct alignment, clean contact surfaces and the specified tightening torque. Loose or crooked connections can lead to increased contact resistance and thermal overload. Damaged or corroded connection terminals and also missing protective caps should be replaced.

Damage to the starter caused by changes in the starting system

Changes in the starter system can significantly impair the electrical and mechanical components of the starter. Such changes could include batteries with unsuitable characteristics or changes to the wiring that can alter the current flow and the load on the components. These issues can lead to an overload of the starter.

Cause:
If components are used in the starter system that do not comply with the manufacturer's specifications, the current flow in the system can change considerably. A battery that is too small and that has a high internal resistance can lead to voltage drops during the starting process. An oversized battery with very low internal resistance, on the other hand, can cause current peaks that overload the starter electrically and mechanically. Modified cabling or cabling that deviates from the specifications can also affect the contact resistance or the electrical load. In all these cases, the starter would be operating under conditions for which it has not been designed, a situation which can facilitate overloading of the components.

Effects:
a battery that is too small with a high internal resistance cannot supply the starter sufficiently. This can result in starting problems, slow turning of the engine and excessive heating, even melting of the contacts in the solenoid switch.
If, on the other hand, an oversized battery with very low internal resistance is used, this can overload the starter electrically and mechanically. Possible consequences are thermal overload, demagnetisation in the case of permanently excited starters, tooth fractures on the ring gear and pinion or single-track ratcheting.
Modified or deviating cabling can increase the contact resistance or change the current flow, which can then cause thermal damage to electrical contacts and ultimately lead to a total failure.

Practical tip:
when replacing the battery, it is important to pay careful attention to the capacity and design specified by the vehicle manufacturer. Changes to the wiring of the starter system should only be made in accordance with the manufacturer's instructions and professionally carried out. Modifications or temporary repairs should be avoided so as to prevent overloading and subsequent damage to the starter.

Link tip

Here you will find tips and remedies for specific symptoms and causes for the failure of a defective starter motor . We also show you on this page how to check the charging system such as, for example, carrying out a visual inspection before diagnosis, the checking of batteries, alternator check and testing with the diagnostic unit.
More product information about starters and alternators from Hella can be obtained here, too.

How helpful is this article for you?

Not helpful at all
5
4
3
2
1
Very helpful
Success

Wrong Captcha

Wrong Captcha

Error

Something went wrong

Spare Parts Finder
Licence Plate Manual vehicle identification OE-No.

Enter the Licence Plate number of your vehicle in the input field. You will find the Licence Plate number in your vehicle registration document.

Top manufacturers
Other manufacturers
Vehicle series Back
Vehicle Back

Enter the OE number in the input field. You will usually find the OE number on the spare part itself or in the vehicle documents.

Spare Parts Finder
Simple vehicle identification with licence plate number Also determine spare parts with OE numbers Detailed product information Find wholesalers near you
dummy
Processing Selected Car
Manufacturer
Vehicle series
Vehicle
Engine output
Engine displacement
Fuel type
Construction year
Engine code

Choose category:
Back
dummy
Teilen Sie
Send via Copy link
URL copied to the clickboard !
Article NUmber
Number
Article Number Was Copied !
Search The Web Mounting Instructions
More Details
Name Value
Less Details

Your Dealer
Autoteile Krammer GmbH
dummy
Lechstraße 1-3
68199 Mannheim
Show Map

This might also interest you

Starter damage assessment
Basic Knowledge
Alternator damage assessment
How to diagnose damage to the alternator: ranging from corrosion and short circuits right up to bearing damage.
Reading Time: 1 minute
Basic Knowledge
E-mobility in everyday workshop activities: technology and requirements
Electromobility is changing workshop processes: find out how workshops handle high-voltage systems, new diagnostics procedures and targeted qualifications
Reading Time: 16 minutes
exhaust gas recirculation
Basic Knowledge
Exhaust gas recirculation – EGR valve
Everything about the exhaust gas recirculation system: causes of defective EGR valves, their inspection and replacement - knowledge for the vehicle workshop.
Reading Time: 12 minutes
abs esp control units for braking and driving dynamics
Basic Knowledge
ABS and ESP control units
Important basics and diagnostic information for ABS and ESP control units - everything your workshop needs for repairs.
Reading Time: 4 minutes
Activated carbon container
Basic Knowledge
Activated charcoal canister – facts & info
Everything about the activated charcoal container: how it works, typical fault symptoms and causes in the event of a fault - including workshop tips.
Reading Time: 2 minutes
Keyless go
Basic Knowledge
Keyless Go & Keyless Entry system
Introduction to the Keyless Go system - from function and possible faults to diagnostics, ideal for vehicle workshops.
Reading Time: 12 minutes
nitrogen oxide sensor nox sensor
Basic Knowledge
NOx sensor – troubleshooting and repair instructions
Everything about the NOx sensor: how it works, typical causes of failure, symptoms and fault diagnosis with the control unit.
Reading Time: 8 minutes
Tire pressure monitoring system tpms
Basic Knowledge
TPMS – tyre pressure monitoring system
Overview of direct and indirect tire pressure monitoring systems (TPMS) - everything you need to know for the vehicle workshop.
Reading Time: 15 minutes
Secondary air system
Basic Knowledge
Secondary air injection system: faults & overview
Structure and function of the secondary air system, common fault symptoms and causes of failure - knowledge for your workshop.
Reading Time: 5 minutes
Replacing the horn
Basic Knowledge
Car horn replacement - instructions
Step-by-step instructions for replacing the horn on various models such as the Audi TT/RS and Grand Cherokee.
Reading Time: 5 minutes

Great! Just one more Step

Subscription successful

Head to your inbox and confirm your email address so that you don’t miss our updates!

Get ready for brand new technical videos, car repair advice, trainings, helpful diagnostic tips, marketing campaigns and much more... delivered straight to your inbox every two weeks!