Function and assembly of the alternator freewheel clutch

Important safety note

The following technical information and practical tips have been compiled by HELLA in order to provide professional support to vehicle workshops in their work. The information provided on this website is intended for use by suitably qualified personnel only.

1. Basics

Overrunning belt pulleys on alternators

During an engine's combustion cycle, the rotary movement of the crankshaft is sped up and slowed down This rotational irregularity is transferred to the accessory drive as a result of the alternator's moment of inertia As a result, extreme forces and high torque fluctuations act on the belt drive

2. Function

Function and structure of the alternator freewheel clutch

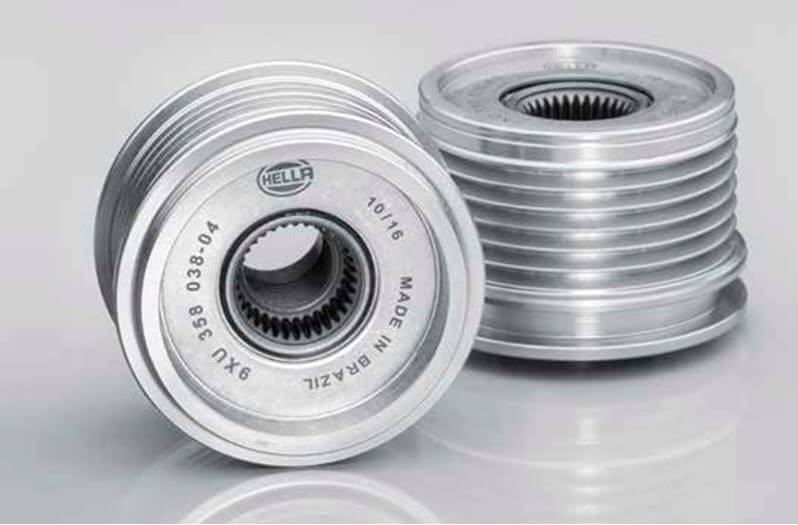
The overrunning alternator pulley, or alternator freewheel clutch, is mounted directly on the drive shaft of the alternator instead of the rigid pulley and has the task of decoupling the three-phase alternator from the rotational irregularities of the crankshaft. This reduces the influence of the moment of inertia on the alternator and the load on the belt drive.

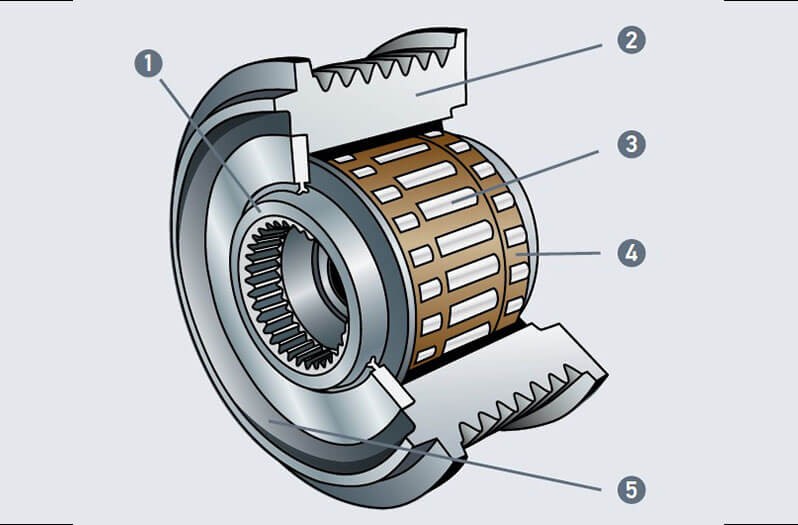
The overrunning alternator pulley is structured as follows:

    1.Inner race with serration
    2.Outer race with profiled raceway
    3.Freewheel unit
    4.Radial support bearings
    5.Overrunning alternator pulley
3. Benefits

Advantages of the alternator freewheel clutch

By mounting an overrunning alternator pulley, only the driving force of one direction of rotation is transmitted to the alternator, thus reducing friction and wear.

Advantages of an overrunning alternator pulley:

  • Reduced impact on the belt drive
  • Reduced fuel consumption
  • Longer lifetime for all components
  • Greater driving comfort and improved noise levels
  • Higher alternator idle speed

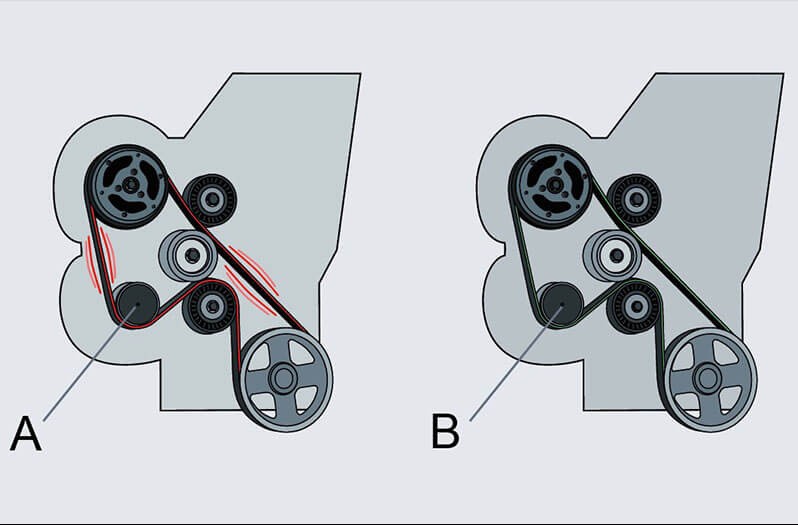
Effects with and without overrunning alternator pulley:

  • Accessory drive with rigid pulley (A): Severe vibrations and resultant thrashing noise from the drive belt
  • Accessory drive with alternator freewheel clutch (B): Reduction in belt vibrations
4. Mounting instructions

Installation instructions for alternator freewheel clutch

Article numbers: 9XU 358 038-xxx and 9XU 358 039-xxx

We recommend the following procedure:

  • Switch off engine
  • Remove ignition key
  • Remove the V-ribbed belts
  • Remove the cover cap on the alternator freewheel clutch
  • Fix the overrunning alternator pulley in place
  • Insert installation tool
  • Rotate installation tool
  • Loosen and remove the alternator freewheel clutch
  • Mount and tighten the new alternator freewheel clutch (tightening torque 80 +/- 5 Nm)
  • Fit cover cap and V-ribbed belts
  • Perform functional check

Important!

Refer to the removal and installation instructions from the relevant
vehicle manufacturer.
  • Installation may only be carried out by a qualified specialist
  • Note tightening torque
  • Do not use pneumatic tools

How helpful is this article for you?

Not helpful at all
5
4
3
2
1
Very helpful
Success

Wrong Captcha

Wrong Captcha

Error

Something went wrong

Spare Parts Finder
Licence Plate Manual vehicle identification OE-No.

Enter the KBA number of your vehicle in the input field. You will find the KBA number in your vehicle registration document.

Top manufacturers
Other manufacturers
Vehicle series Back
Vehicle Back

Enter the OE number in the input field. You will usually find the OE number on the spare part itself or in the vehicle documents.

Spare Parts Finder
Simple vehicle identification with licence plate number Also determine spare parts with OE numbers Detailed product information Find wholesalers near you
dummy
Processing Selected Car
Manufacturer
Vehicle series
Vehicle
Engine output
Engine displacement
Fuel type
Construction year
Engine code

Choose category:
Back
dummy
Teilen Sie
Send via Copy link
URL copied to the clickboard !
Article NUmber
Number
Article Number Was Copied !
Search The Web Mounting Instructions
More Details
Name Value
Less Details

Your Dealer
Autoteile Krammer GmbH
dummy
Lechstraße 1-3
68199 Mannheim
Show Map

You might also be interested in

Ultrasound-based parking aid - park distance control (PDC)
Basic Knowledge
Park Distance Control (PDC): a parking aid based on ultrasound
Learn all about the function and maintenance of ultrasonic parking aids (PDC), including repair tips.
Reading Time: 5 minutes
Test electric vacuum pump
Basic Knowledge
Inspecting an electric vacuum pump and troubleshooting
Tips on all aspects of electric vacuum pumps - from testing and diagnostics to removal and installation instructions, supplemented by videos.
Reading Time: 8 minutes
Airbag system
Basic Knowledge
Car airbag system – design & function
An overview of the airbag system: structure, function and diagnostic tips for safe repair and maintenance.
Reading Time: 15 minutes
Check electronic boost pressure control turbocharger actuator
Basic Knowledge
Electronic boost pressure control- turbocharger actuator testing
Learn how the electronic boost pressure control works and how the turbocharger actuator is tested on a Mercedes-Benz.
Reading Time: 8 minutes
Check the starter
Basic Knowledge
Checking the starter - Causes of failure, troubleshooting
Everything you need to know about typical starter motor faults and how to rectify them - with instructions for testing and repair.
Reading Time: 9 minutes
Testing alternators
Basic Knowledge
Checking the alternator
Detailed solutions for problems with the alternator - from testing to troubleshooting, everything for your vehicle workshop.
Reading Time: 8 minutes
Keyless go
Basic Knowledge
Keyless Go & Keyless Entry system
Introduction to the Keyless Go system - from function and possible faults to diagnostics, ideal for vehicle workshops.
Reading Time: 12 minutes
Secondary air system
Basic Knowledge
Secondary air injection system: faults & overview
Structure and function of the secondary air system, common fault symptoms and causes of failure - knowledge for your workshop.
Reading Time: 5 minutes
Tire pressure monitoring system tpms
Basic Knowledge
TPMS – tyre pressure monitoring system
Overview of direct and indirect tire pressure monitoring systems (TPMS) - everything you need to know for the vehicle workshop.
Reading Time: 15 minutes
Activated carbon container
Basic Knowledge
Activated charcoal canister – facts & info
Everything about the activated charcoal container: how it works, typical fault symptoms and causes in the event of a fault - including workshop tips.
Reading Time: 2 minutes

Quick question

Great! Just one more Step

Subscription successful

Head to your inbox and confirm your email address so that you don’t miss our updates!

Get ready for brand new technical videos, car repair advice, trainings, helpful diagnostic tips, marketing campaigns and much more... delivered straight to your inbox every two weeks!