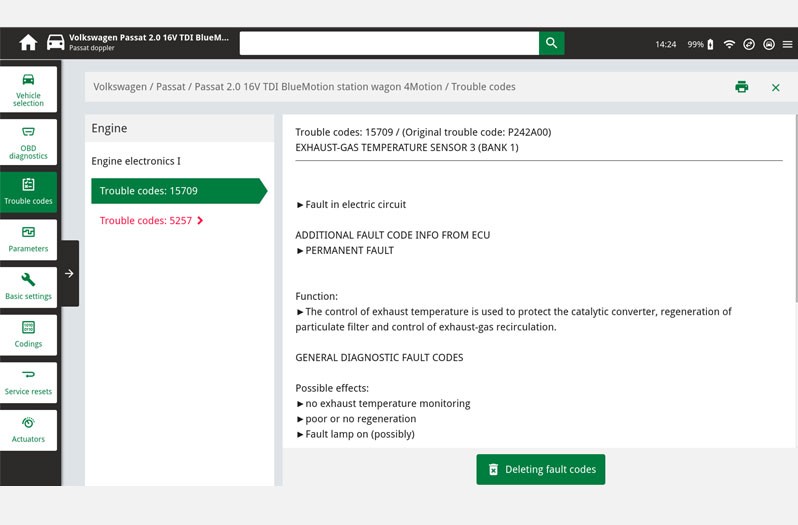
Checking the exhaust gas temperature sensor

In modern vehicle models, exhaust gas temperature sensors are installed at various points in the exhaust gas system in both diesel and petrol vehicles. The exhaust gas temperature sensor detects the temperature, for example, in front of the catalytic converter or diesel particulate filter and sends this as a voltage signal to the engine control unit. The engine control unit needs this information in order to control the air-fuel ratio or the particulate filter regeneration and thus effectively reduce emissions. In addition, high temperature sensors protect components in the area of ​​the hot exhaust gas flow from critical overheating.

Important safety note

The following technical information and practical tips have been compiled by HELLA in order to provide professional support to vehicle workshops in their day-to-day work. The information provided on this website is intended for suitably qualified personnel only.

1. Design and function

Exhaust gas temperature sensor

An electrical resistor is installed in the measuring tip of the exhaust gas temperature sensor, the value of which changes depending on the temperature. These resistors are called thermistors and are divided into two groups. Here a distinction is made between NTC thermistors and PTC thermistors, depending on their temperature behaviour ( Figure 1 ).

NTC - resistor with negative temperature coefficient (the resistance decreases with increasing temperature)

PTC - resistor with positive temperature coefficient (the resistance increases with increasing temperature)

The exhaust gas temperature sensor (EGTS) is usually connected directly to the engine control unit (ECU). Together with another resistor (RUP) in the control unit, the sensor forms a series connection through which an electrical voltage is divided. The signal is measured at the voltage divider and converted into temperature information by an algorithm ( Figure 2 ).

2. Effects

Exhaust gas temperature sensor - Symptoms

The following effects can occur in the event of an exhaust gas temperature sensor failure:

  • Warning lamp for glow plug system flashes
  • Warning lamp for particulate filter lights up
  • Engine control lamp is on
  • Increase in exhaust emissions (CO, NOx and HC)
  • Poor driving behaviour because of shortened regeneration intervals of the particulate filter 
  • Increased fuel consumption caused by longer particulate filter regeneration
  • Loss of performance caused by incorrect detection of the degree of saturation of the particulate filter
3. Causes of failure

Exhaust gas temperature sensors - defective

The following causes can be responsible for the failure of the exhaust gas temperature sensor:

  • Power supply faulty
  • External damage
  • Internal damage to the electrical wiring caused by strong vibrations in the exhaust gas system
  • Excessively high exhaust gas temperatures as a result of defects in the injection system or in the air-fuel mix
4. Troubleshooting

Checking the exhaust gas temperature sensor

System overview

The following information is illustrated using a VW Passat 2.0 16 V TDI from the year 2015 as an example. Depending on the vehicle features, up to four exhaust gas temperature sensors can be installed. Engine control monitors the temperature before the catalytic converter, turbocharger and also upstream and downstream of the diesel particulate filter.

In vehicles without a SCR (Selective Catalytic Reduction) catalytic converter, the exhaust gas temperature sensor behind the diesel particulate filter is not required. In the event of a defective exhaust gas temperature sensor or in the case of implausible output values, the system switches to emergency operation or alternatively uses a substitute value to protect the relevant components from overheating. An error entry is then recorded in the engine control unit and the warning lamp in the dashboard is activated.

Testing with the diagnostic unit

The function of the exhaust gas temperature sensor is monitored by the respective higher-level system control unit. Any errors that occur are stored in the error memory of the control unit and can be replaced by using a suitable diagnostic unit. Depending on the system, additional parameters can be displayed and used for troubleshooting.

1

Error code

In this function the error codes stored in the error memory can be read out and deleted. In addition, information on the error code can be called up.

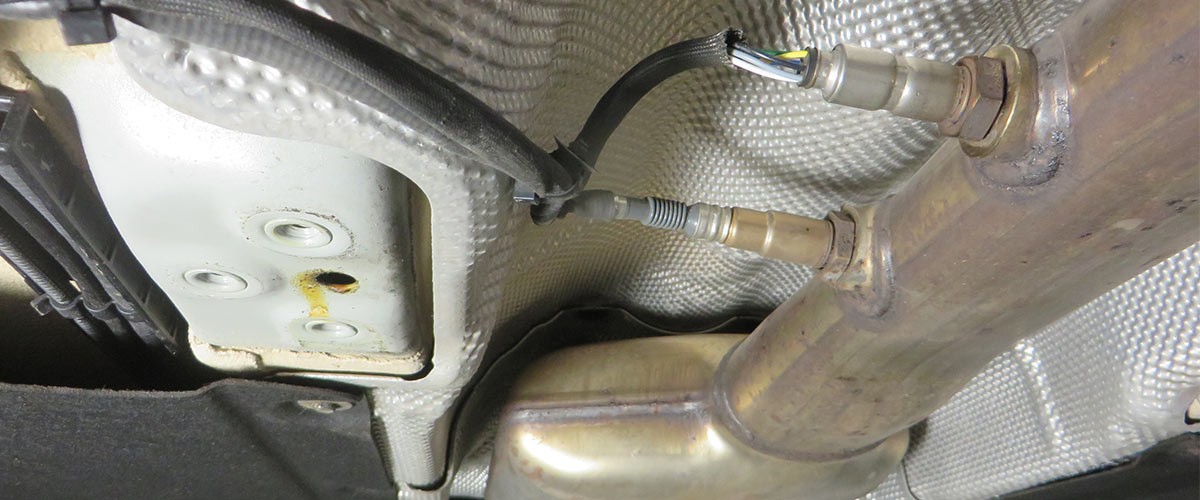
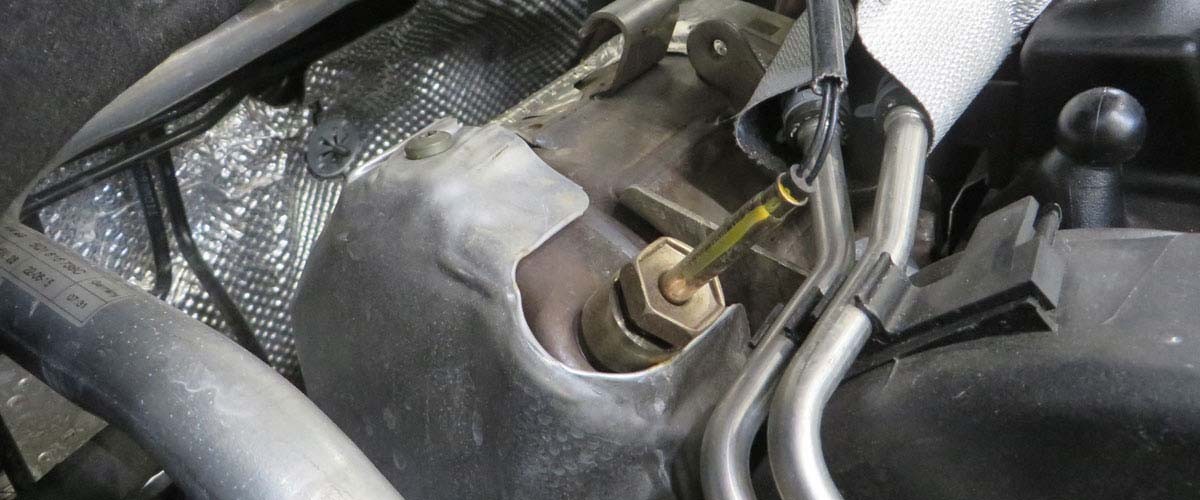
  • In our case study the error codes 15709 and 5257 are displayed, codes which indicate a fault in exhaust gas temperature sensor 3.

2

Parameters

In this function, the current measured values of the sensor in the control unit can be displayed and evaluated.

  • Illustration shows a vehicle with three exhaust gas temperature sensors
  • Sensor 3 shows a value of minus 40 degrees, which may be due to an interruption in the electrical wiring or to a defect in the sensor.

3

Circuit diagrams

System-specific circuit diagrams can be taken from vehicle information and used for troubleshooting purposes. Here the PIN assignment on the exhaust gas temperature sensor or the cable colours can be read off and used for further tests.

Maintenance and repair instructions!

  • As part of troubleshooting, a visual inspection of the components and peripherals in the engine compartment should first be carried out after the ECU diagnosis.
  • The sensor should be replaced if the connecting cable or sensor housing is damaged.
  • If the threads of the exhaust gas temperature sensors are coated, they must not be treated with an extra coating of hot thread paste.
  • Exhaust gas temperature sensors must be tightened to the specified tightening torque! We recommend a tightening torque of 40 - 45 Nm for HELLA exhaust gas temperature sensors.

Please also observe the respective maintenance and repair instructions provided by each individual vehicle manufacturer!

Important!

The various diagnostic options have been illustrated using the mega macs 77 diagnostic unit as an example. The respective test depth and variety of functions can be set out differently depending on the vehicle manufacturer and is dependent on the relevant system configuration of the control unit.

Schematic illustrations, pictures and descriptions serve to explain and illustrate the document text and cannot be used as a basis for vehicle-specific repairs.

Localizador de peças sobressalentes
Número da matrícula Identificação manual do veículo OE-no.

Insira o número da matrícula do seu veículo no campo de entrada. Encontrará o número da matrícula no documento de registo do veículo.

Erro

Infelizmente, o seu veículo não foi encontrado. Certifique-se de que os dados introduzidos estão corretos ou tente novamente.

Principais fabricantes
Outros fabricantes
Série de veículos Voltar
Veículo Voltar

Insira o número OE no campo de entrada. Normalmente, encontrará o número OE na própria peça sobressalente ou nos documentos do veículo.

Localizador de peças sobressalentes
Identificação simples do veículo com matrícula Determine também as peças sobressalentes com números OE Informações detalhadas sobre o produto Encontre grossistas perto de si
dummy
Processing Selected Car
Fabricante
Modelo
Veículo
Potência [CV/kW]
Cilindrada [ccm]
Tipo de combustível
Ano de fabrico
Código do motor

Escolher categoria:
Voltar
dummy
Partilhar
Enviar por Copiar link
URL copiado para o clipboard!
Número do item
Number
O número foi copiado para a sua área de transferência!
Pesquisar na web Instruções de montagem
Mais detalhes
Nome do produto Valor
Menos detalhes

O seu revendedor
Autoteile Krammer GmbH
dummy
Lechstraße 1-3
68199 Mannheim
Mostrar mapa

Até que ponto este artigo é útil para si?

Não ajuda em nada
5
4
3
2
1
Muito útil
Sucesso

Wrong Captcha

Wrong Captcha

Erro

Algo correu mal

You might also be interested in

Conhecimentos básicos
Mobilidade elétrica no dia a dia da oficina: tecnologia e requisitos
A mobilidade elétrica está a mudar os processos nas oficinas: saiba como as oficinas trabalham com sistemas de alta voltagem, novos processos de diagnóstico e qualificação específica
Tempo de leitura: 19 minutos
Avaliação de danos no motor de arranque
Conhecimentos básicos
Avaliação de danos no alternador
Como diagnosticar danos no alternador: desde corrosão e curtos-circuitos até danos nos rolamentos.
Tempo de leitura: 1 minuto
Avaliação de danos no motor de arranque
Conhecimentos básicos
Avaliação de danos no motor de arranque
Motor de arranque com defeito? Descubra as causas típicas, como sobrecarga ou falhas de ignição, e como reparar os danos de forma eficaz.
Tempo de leitura: 1 minuto
nitrogen oxide sensor nox sensor
Conhecimentos básicos
NOx sensor - troubleshooting and repair instructions
Everything about the NOx sensor: how it works, typical causes of failure, symptoms and fault diagnosis with the control unit.
Tempo de leitura: 9 minutos
Sensor da árvore de comando de válvulas
Conhecimentos básicos
Sensor da árvore de comando de válvulas - Funcionamento e detecção de erros
Saiba tudo sobre o funcionamento e o teste do sensor da árvore de comando, bem como os possíveis sintomas de uma avaria.
Tempo de leitura: 3 minutos
Controlar o medidor de massa de ar
Conhecimentos básicos
Controlar o medidor de massa de ar - Sintomas e detecção de erros
Aprenda a verificar um sensor de fluxo de ar em massa, a reconhecer sensores defeituosos e a substituí-los profissionalmente.
Tempo de leitura: 3 minutos
Idle speed controllers / idle speed actuators
Conhecimentos básicos
Regulador da marcha lenta / posicionador da marcha lenta - Funcionamento e controle
Tudo para testar e resolver problemas com reguladores de rotação em marcha lenta: Funcionamento, sintomas típicos e instruções de reparação para a sua oficina.
Tempo de leitura: 4 minutos
Controlar a sonda lambda
Conhecimentos básicos
Controlar a sonda lambda - Defeito, sintomas, substituição
Descubra como verificar e medir sensores lambda - com instruções passo a passo para o diagnóstico de falhas.
Tempo de leitura: 16 minutos
Controlar o sensor da temperatura do líquido de arrefecimento
Conhecimentos básicos
Controlar o sensor da temperatura do líquido de arrefecimento - Detecção de erros
Instruções para testar o sensor de temperatura do líquido de arrefecimento com um multímetro - diagnóstico e reparação para a sua oficina.
Tempo de leitura: 3 minutos
Sensor de detonação
Conhecimentos básicos
Sensor de detonação - Funcionamento e detecção de erros
Descubra como verificar se o sensor de deteção de falhas está a funcionar corretamente e como corrigir possíveis sintomas de avaria.
Tempo de leitura: 3 minutos

Ótimo! Só mais um passo

Subscrição bem-sucedida

Aceda à sua caixa de entrada e confirme o seu endereço de e-mail para não perder as nossas atualizações!

Aguarde novos vídeos técnicos, conselhos sobre reparação automóvel, formação, dicas úteis de diagnóstico, campanhas de marketing e muito mais... diretamente na sua caixa de entrada, a cada duas semanas!