Golf 6 rear combination lamp encoding

The exterior lighting on a vehicle offers a wealth of opportunities for customising the vehicle. Retrofitting LED rear combination lamps is a very popular modification. However, on modern vehicles it isn't enough to simply replace the lamps. In many cases the cables also need to be adjusted and the vehicle electric system control unit needs to be encoded accordingly. This page explains the work that needs to be done in these cases using the example of a Golf 6.

Important safety note

The following technical information and practical tips have been compiled by HELLA in order to provide professional support to vehicle workshops in their day-to-day work. The information provided on this website is intended for suitably qualified personnel only.

1. Basic principles

Encoding the golf 6 led rear combination lamp

The number of different vehicle types is increasing from year to year. The success of “niche models” is further softening the delineation between traditional classifications such as station wagon, sedan, or van. In addition, new developments in the fields of driver assistance, communication, and safety systems are creating further distinctive features to fulfil customer wishes.

Modifications and tuning of the exterior lighting are in the Top 10 of customer wishes – particularly since the introduction of daytime running lights . Conversion to xenon headlights r LED rear combination lamps are also in demand.

However, the challenges involved in the installation of such lighting systems increase with the complexity of the products.

For some years now, control units have been controlling, regulating, and monitoring lighting functions. If different lamps or headlamps are installed in the vehicle, the control unit has to be “informed”. This is where “encoding” comes into the picture. During encoding, parameters are changed in the respective control unit to guarantee perfect operation of the lighting functions.

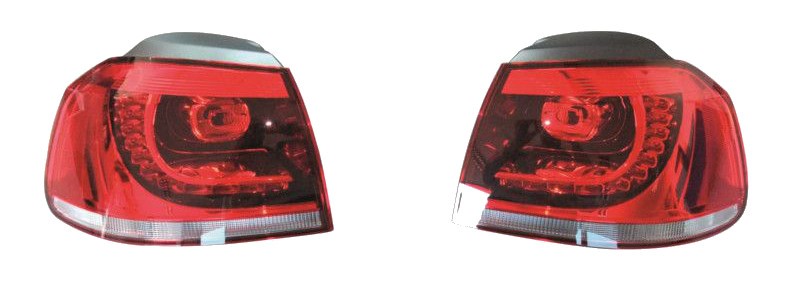
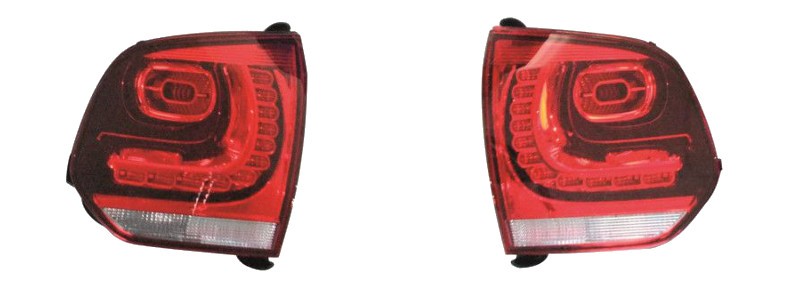
Example of HELLA Golf 6 LED rear combination lamp

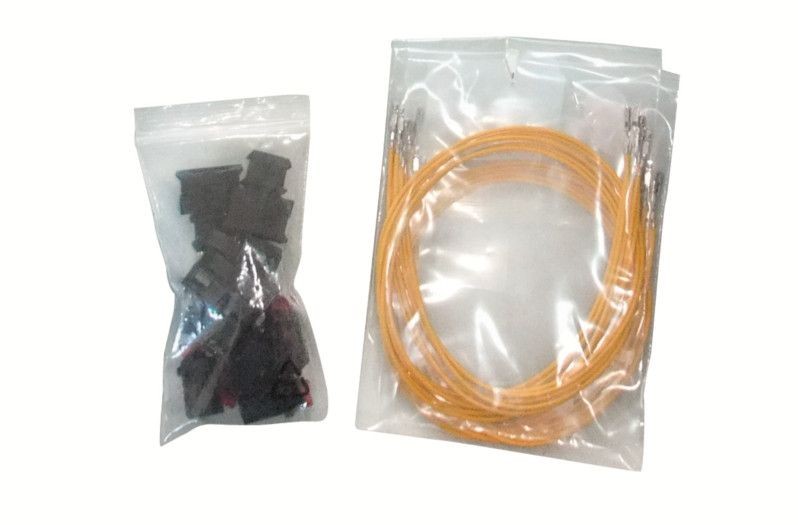
In addition to the HELLA rear combination lamps, adapter cables are always required since LED lamps have different connections. These adapter cables are relatively easy to make yourself.

The following items are required for complete conversion:

  • HELLA, exterior LED rear combination lamps no. 2SD 010 408-071 left / -081 right
  • HELLA, interior LED rear combination lamps no. 2SA 010 409-131 left /ft2TZ 010 409-141 right
  • Connector for connection to the LED lamps VW no. 4x 7N0 972 703
  • Socket for connection to the wiring harness VW no. 4x 191 972 713
  • Crimp contacts HELLA no. 8KW 863 931-003
  • Individual wires with crimped contacts VW no. 6x 000 979 150 EA
2. Instructions

Making the adapter cables

1

Cut the cables in the middle

Cut the 6 cables in the middle so that you have 12 cables: One end with a crimp contact, the other without contact. Then shorten the cables to approx. 10 cm.

2

Click the cable ends into the connector

Click the cable ends equipped with the blade terminals into the connector (7N0 972 703) for the LED lamps.

3

Strip the cable ends and crimp contacts in place

Strip the other cable ends by approx. 6 mm and crimp contacts 8KW 863 931-003 in place. You will need a pair of pliers for non-insulated crimp contacts for this (HELLA no. 8PE 002 007-011).

During this working step, make sure that the LED connector with the red locking hoop is at the top and the crimp contacts are aligned evenly to one another. This prevents the cables twisting during subsequent connector assembly.

4

Click the cable ends into the socket

Click the cable ends with the blade terminals into the socket (191 972 713). Make sure the cables are in the right order! (Red locking hoop from connector and chamber numbers 1, 2, 3 from the socket must be visible from above).

5

Repeat the working steps

Now repeat these working steps for the other three adapters

3. Instructions

Installing the lamps in the vehicle

1

Pull off the side panel

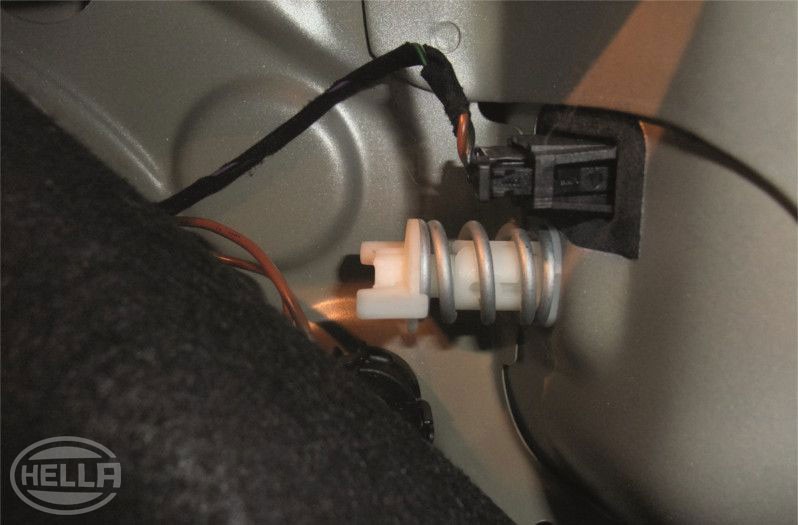
Open the trunk lid. Pull the side panel in the trunk backward and off so that the knurled-head screw is easy to reach.
2

Remove the light

Unlock the contact plug and remove it from the light.

3

Unscrew the knurled-head screw from the light

4

Pull the light backward and out of the body

5

Insert the adapter

Insert the adapter into the LED light (exterior light). Then push the red locking hoop to the limit stop toward the light.

6

Insert the LED light

Insert the LED light into the body and tighten using the knurled nut.

Caution! Heed the guides on the light during insertion.

7

Connect the socket with the connector

Connect the adapter socket with the connector from the vehicle harness

8

Remove the flap

Unlock and remove the flap from the trunk lid.

9

Loosen the M8 screws on the light

Caution! Unlatch the plastic strip on the side of the light and remove downward.

10

Insert the inner LED light

Insert the inner LED light into the body and tighten using the M8 screws. Click the plastic strip back onto the light.

11

Connect the adapter

Connect the adapter with the light and the vehicle harness.

12

Install the removed parts

Install all the removed parts in reverse order.
4. Instructions

Encoding

On account of the different characteristics of lamps with filament bulbs and lamps with LEDs, the control unit – known as “Body Control Module” (BCM) at VW – has to be “encoded”. Parameters are changed in the control unit in such a way that the LED rear combination lamps work perfectly. If this does not happen, fault messages will appear on the display and lamps will only have limited functionality. (The stop light in the tailgate can shine more brightly than the stop light in the exterior lamps).

Caution!
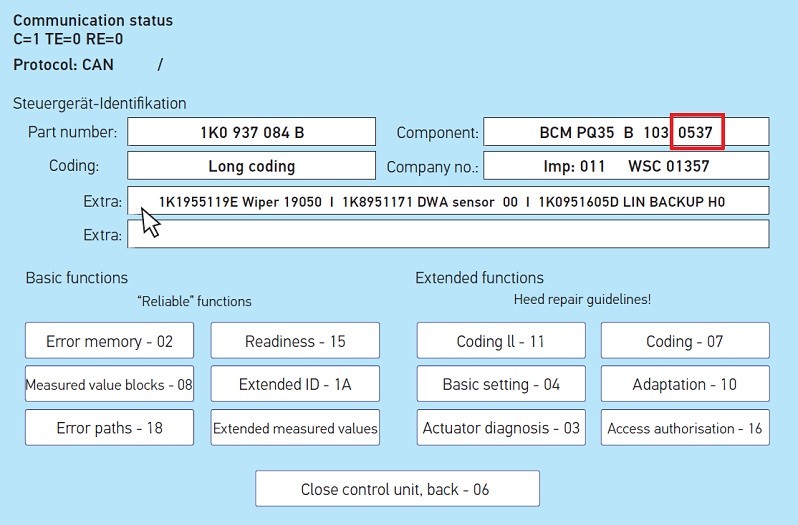
Conversion is not possible with every BCM. There are different specifications for the Golf VI concerning the production date (vehicle) from which perfect functionality of the lighting functions is guaranteed. Before a vehicle is converted to LED lamps, we recommend reading out the BCM software version (see Figure 9 ).

Generally speaking, there are two different BCMs: The old one with software version 03XX. Proper conversion is not possible with this BCM. If a customer would still like to equip their vehicle with LED lamps, a new BCM will have to be installed as well. The old BCM cannot be updated to a newer software version.

Conversion is generally possible with the new BCM with the software version 05XX (0537, 0541). In vehicles with these software versions and standard xenon headlights, there is still a special factor that has to be taken into account: After the rear combination lamps have been encoded, the option “permanent driving light” (low beam is always activated when the engine is switched on) is no longer available. If this option is to remain active, the BCM must be updated to a newer version (SW version 0575 or later).

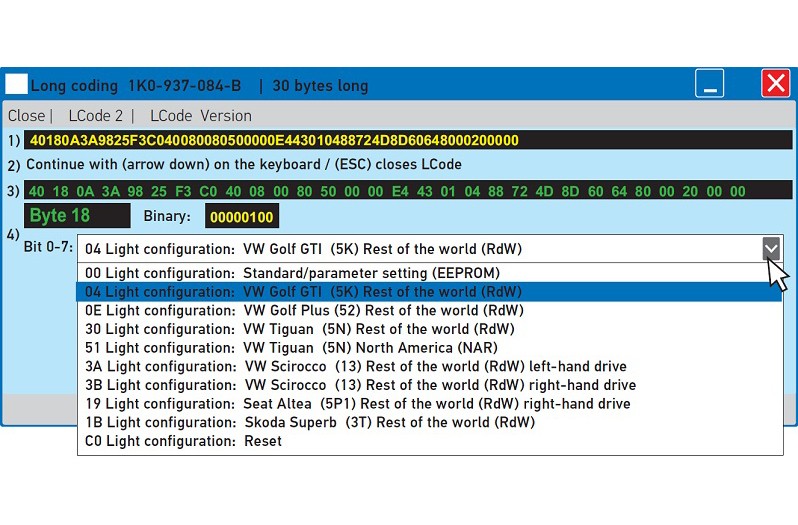
Once the software version has been checked, encoding takes place. For this purpose, the “long coding” is requested via the menu items Central electrics – Coding. For LED rear combination lamps, only byte 18 is changed. The BCM lists the possible changes for this byte in a sub-menu (see Figure 10 ).

In this case, the bit must be changed to “04”. Once encoding has been completed, faults will no longer be indicated.

Jak moc vám tento článek pomohl?

Vůbec nepomohl
5
4
3
2
1
Velmi užitečný
Děkujeme za váš názor!

Nesprávný kód Captcha

Nesprávný kód Captcha

Došlo k chybě

Something went wrong

Vyhledávač náhradních dílů
Číslo dílu Ruční identifikace vozidla Univerzální díly
Přední výrobce
Ostatní výrobci
Řada vozidel Zpět
Vozidlo Zpět

Zadejte číslo OE do vstupního pole. Číslo OE obvykle najdete přímo na náhradním dílu nebo v dokladech k vozidlu.

Vyhledávač náhradních dílů
Určete také náhradní díly podle čísel originálních dílů (OE) Podrobné informace o produktu Najděte velkoobchody ve vašem okolí
dummy
Processing Selected Car
Výrobce
Řada vozidel
Vozidlo
Výkon motoru
Objem motoru
Druh paliva
Rok výroby
Kód motoru

Vyberte kategorii:
Zpět
dummy
Sdílejte
Odeslat přes Kopírovat odkaz
URL byla zkopírována do schránky!
Číslo článku
Number
Číslo článku bylo zkopírováno!
Vyhledávání na webu Návod k montáži
Další podrobnosti
Jméno Hodnota
Zobrazit méně podrobností

Váš prodejce
Autoteile Krammer GmbH
dummy
Lechstraße 1-3
68199 Mannheim
Zobrazit mapu

Further technical information

Adjusting and replacing LED headlamps
Základní znalosti
Adjusting and replacing LED headlamps
Step-by-step instructions for adjusting and changing LED headlights on the Mercedes Benz W212 - with video.
Doba čtení: 9 minut
Signal lights in cars
Základní znalosti
Car indicators & signal lights: regulations, faults, tests
A general guide to headlight adjustment - with video and tips on optimising light distribution for your workshop.
Doba čtení: 6 minut
Headlights
Základní znalosti
Headlight lens components, types & regulations
Comparison of the four most important headlamp systems, including regulations for vehicle lighting - knowledge for the vehicle workshop.
Doba čtení: 10 minut
SSL | HD Matrix LED lamps: Troubleshooting
Základní znalosti
SSL | HD Matrix LED lamps: Troubleshooting
Find out how SSL-HD-Matrix LED headlights are constructed and how they communicate in the vehicle, plus service and repair tips.
Doba čtení: 9 minut
Headlamp cleaning system
Základní znalosti
Headlamp cleaning system: Faults, testing
Find out all about headlight cleaning systems, how they work, common causes of failure and repair tips.
Doba čtení: 4 minuty
Xenon and headlight bulb replacement
Základní znalosti
Xenon lamps and headlight bulb replacement
Instructions for changing low beam and xenon lamps in various vehicle types - for the vehicle workshop.
Doba čtení: 3 minuty
Condensation in headlight
Základní znalosti
Condensation in headlight – troubleshooting
Problems with moisture in the headlight? We will show you how to find the cause and fix the problem professionally.
Doba čtení: 5 minut
High-beam assist
Základní znalosti
High-beam assist – basic principles
The high beam assistant: Function, adjustment and how it enables glare-free driving - ideal for workshops that advise professionals.
Doba čtení: 6 minut
Adaptive headlights
Základní znalosti
AFS headlights: Adaptive lighting system explained
Discover how AFS headlights work and what you need to know about the Advanced Frontlighting System.
Doba čtení: 5 minut
Bend lighting
Základní znalosti
Bend lighting: Function, symptoms, check
Dynamic and static bend lighting: Function, troubleshooting and repair tips - including valuable workshop tips.
Doba čtení: 2 minuty