

Checking the coolant temperature sensor – symptoms, cause of failure and troubleshooting

The coolant temperature sensor informs the engine control unit about the operating temperature of the engine, so that the fuel quantity and ignition point can be adapted accordingly. On this page, we will explain to you the functional principle of the coolant temperature sensor and show you how to correctly localise causes of faults during troubleshooting, among other things.

Important safety note

The following technical information and practical tips have been compiled by HELLA in order to provide professional support to vehicle workshops in their day-to-day work. The information provided on this website is intended for suitably qualified personnel only.

1. Functional principle

Coolant temperature sensor function

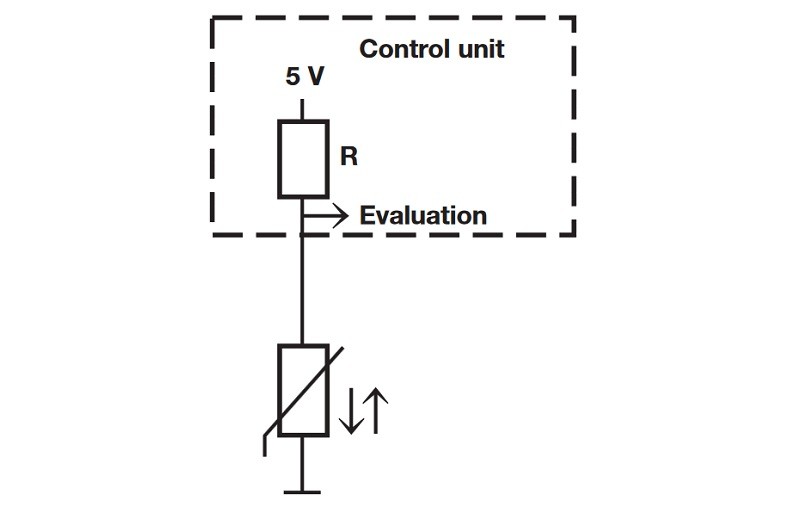
Coolant temperature sensors are used by the fuel management system to detect the engine's operating temperature. Depending on the sensor information, the control unit adapts the injection time and firing angle to the operating conditions. The sensor is a temperature sensor with a negative temperature coefficient. This means that the internal resistance reduces as the temperature increases.

The resistance of the temperature sensor changes depending on coolant temperature. As the temperature increases, the resistance is reduced, which reduces the voltage at the sensor. The control unit evaluates these voltage values, since they are directly related to the coolant temperature (low temperatures result in high voltage values at the sensor, and high temperatures result in low voltage values).

2. Symptoms

Coolant temperature sensor faulty

A faulty coolant temperature sensor can manifest itself in different ways through fault detection by the control unit and the resulting emergency program strategy.

Frequent fault symptoms are:

  • Higher idle speed
  • Increased fuel consumption
  • Poor starting behaviour

In addition, problems may also occur with the exhaust gas test cycle through increased CO values or intermission of the lambda control. The following entries can be stored in the fault memory of the control unit:

  • Short circuit to frame in the wiring or short circuit in the sensor
  • Positive fault or break in wiring
  • Implausible changes in signal (signal jump)
  • Engine does not reach the minimum coolant temperature

The last fault code can also occur if the coolant thermostat is faulty.

3. Troubleshooting

Checking the coolant temperature sensor

Troubleshooting:

  • Read out the fault memory
  • Check the electrical connections of the sensor wiring, the plug, and the sensor for correct connection, breaks, and corrosion.

Checks are carried out using the multimeter

1

Test step 1

The internal resistance of the sensor is determined. The resistance is temperature-dependent. When the engine is cold it is high-impedance, and when the engine is hot it is low-impedance.

Depending on the manufacturer:
25°C 2.0 – 6 KOhm or 80°C approx. 300 Ohm
Please note the special reference value specifications.

2

Test step 2

Check the wiring to the control unit by checking continuity and short circuit to frame for every wire to the control unit plug.

  1. Connect ohmmeter between temperature sensor plug and removed control unit plug. Reference value: approx. 0 Ohm (circuit diagram required for pin assignment on control unit).
  2. Check the respective pin at the sensor plug against ground using an ohmmeter and with the control unit plug removed. Reference value: >30 MOhm.

3

Test step 3

Check the supply voltage at the removed sensor plug using the voltmeter. This is done with the control unit plugged in and the ignition turned on. Reference value: approx. 5 V.

If the voltage value is not reached, the voltage supply of the control unit and the ground supply must be checked according to the circuit diagram. If these are OK, a control unit fault comes into question.

Jak moc vám tento článek pomohl?

Vůbec nepomohl
5
4
3
2
1
Velmi užitečný
Děkujeme za váš názor!

Nesprávný kód Captcha

Nesprávný kód Captcha

Došlo k chybě

Something went wrong

Vyhledávač náhradních dílů
Číslo dílu Ruční identifikace vozidla Univerzální díly
Přední výrobce
Ostatní výrobci
Řada vozidel Zpět
Vozidlo Zpět

Zadejte číslo OE do vstupního pole. Číslo OE obvykle najdete přímo na náhradním dílu nebo v dokladech k vozidlu.

Vyhledávač náhradních dílů
Určete také náhradní díly podle čísel originálních dílů (OE) Podrobné informace o produktu Najděte velkoobchody ve vašem okolí
dummy
Processing Selected Car
Výrobce
Řada vozidel
Vozidlo
Výkon motoru
Objem motoru
Druh paliva
Rok výroby
Kód motoru

Vyberte kategorii:
Zpět
dummy
Sdílejte
Odeslat přes Kopírovat odkaz
URL byla zkopírována do schránky!
Číslo článku
Number
Číslo článku bylo zkopírováno!
Vyhledávání na webu Návod k montáži
Další podrobnosti
Jméno Hodnota
Zobrazit méně podrobností

Váš prodejce
Autoteile Krammer GmbH
dummy
Lechstraße 1-3
68199 Mannheim
Zobrazit mapu