Crankshaft sensor

The crankshaft sensor is one of the key providers of information of the engine control. It detects the speed and position of the crankshaft and forwards this information to the engine control in the form of an electrical signal. On this page, you can find out how crankshaft sensors work, and what must be taken into account when checking them in order to prevent damage.

Important safety note

The following technical information and practical tips have been compiled by HELLA in order to provide professional support to vehicle workshops in their day-to-day work. The information provided on this website is intended for suitably qualified personnel only.

1. Functional principle

Crankshaft position sensor function

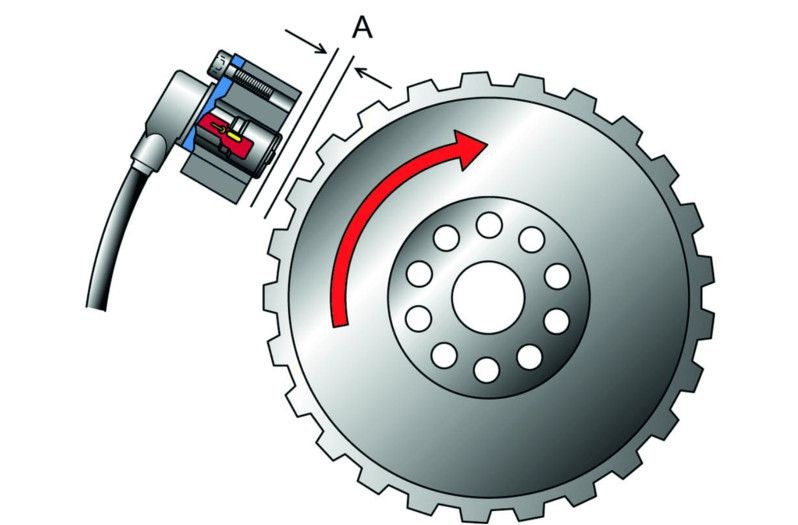
The function of crankshaft sensors is to measure the crankshaft's speed and position. They are most commonly installed near to the flywheel ring gear. There are two designs: Inductive sensors and Hall generators. Before the crankshaft sensor is tested, it is essential to know which type of transmitter is involved.

The rotary movement of the ring gear results in changes to the magnetic field. These generate varying voltage signals in the crankshaft sensor, which are transmitted to the control unit. The control unit uses the signals to calculate speed and position of the crankshaft in order to gain important basic data for injection and ignition timing.

2. Symptoms

Crankshaft sensor defective

A faulty crankshaft sensor can cause the following symptoms:

  • Engine stalls
  • Engine standstill
  • Problems starting
  • Error code is stored
3. Cause of failure

Causes of defective crankshaft sensors

Causes of failure can be:

  • Internal short circuits
  • Breaks in wiring
  • Wiring short circuit
  • Mechanical damage to the encoder wheel
  • Soiling caused by metal abrasion
4. Troubleshooting

Checking the crankshaft sensor

Troubleshooting:

The following procedure is recommended for troubleshooting:

    1. Read out the fault memory
    1. Check the electrical connections of the sensor wiring, the connector, and the sensor for correct connection, breaks, and corrosion.
    1. Watch out for soiling and damage

Direct checks on the crankshaft sensor can be difficult if the exact design type of the sensor is not known. Before the checks, it must be clear whether the sensor is an inductive sensor or Hall generator. It is not always possible to distinguish between the two in terms of appearance. If there are three pins on the connector, no precise statements can be made about the respective type. The specific manufacturer specifications and the specifications in the spare-parts catalog provide further assistance here.

If the design type has not been definitively clarified, an ohmmeter must not be used for the tests. The voltage from the measuring device used for the resistance test could destroy a Hall generator!

If the sensor has a 2-pin connector, it is most likely an inductive sensor. In this case it is possible to determine the internal resistance, a potential short circuit to frame, and the signal. To do this, remove the plug connection and check the internal resistance of the sensor. If the internal resistance value is 200 to 1,000 ohms (depending on the reference value), the sensor is OK. If the value is 0 ohms, there is a short circuit, and in the case of M Ohm there is an interruption. The test for a short circuit to frame is carried out using the ohmmeter from a connection pin to vehicle ground. The resistance value must tend toward infinity. The test using an oscilloscope must result in a sinus signal of sufficient strength. In the case of a Hall generator, only the signal voltage in the form of a square wave signal and the supply voltage are to be tested. This must result in a square wave signal depending on the engine speed.

We should warn again at this point that the use of an ohmmeter can destroy the Hall generator.

Assembly instructions

Make sure that the distance to the encoder is correct and that the sensor is fitted correctly.

Jak moc vám tento článek pomohl?

Vůbec nepomohl
5
4
3
2
1
Velmi užitečný
Děkujeme za váš názor!

Nesprávný kód Captcha

Nesprávný kód Captcha

Došlo k chybě

Something went wrong

Vyhledávač náhradních dílů
Číslo dílu Ruční identifikace vozidla Univerzální díly

Přední výrobce
Ostatní výrobci
Řada vozidel Zpět
Vozidlo Zpět

Zadejte číslo OE do vstupního pole. Číslo OE obvykle najdete přímo na náhradním dílu nebo v dokladech k vozidlu.

Vyhledávač náhradních dílů
Určete také náhradní díly podle čísel originálních dílů (OE) Podrobné informace o produktu Najděte velkoobchody ve vašem okolí
dummy
Processing Selected Car
Výrobce
Řada vozidel
Vozidlo
Výkon motoru
Objem motoru
Druh paliva
Rok výroby
Kód motoru

Vyberte kategorii:
Zpět
dummy
Sdílejte
Odeslat přes Kopírovat odkaz
URL byla zkopírována do schránky!
Číslo článku
Number
Číslo článku bylo zkopírováno!
Vyhledávání na webu Návod k montáži
Další podrobnosti
Jméno Hodnota
Zobrazit méně podrobností

Váš prodejce
Autoteile Krammer GmbH
dummy
Lechstraße 1-3
68199 Mannheim
Zobrazit mapu