Function and assembly of the alternator freewheel clutch

Important safety note

The following technical information and practical tips have been compiled by HELLA in order to provide professional support to vehicle workshops in their work. The information provided on this website is intended for use by suitably qualified personnel only.

1. Basics

Overrunning belt pulleys on alternators

During an engine's combustion cycle, the rotary movement of the crankshaft is sped up and slowed down This rotational irregularity is transferred to the accessory drive as a result of the alternator's moment of inertia As a result, extreme forces and high torque fluctuations act on the belt drive

2. Function

Function and structure of the alternator freewheel clutch

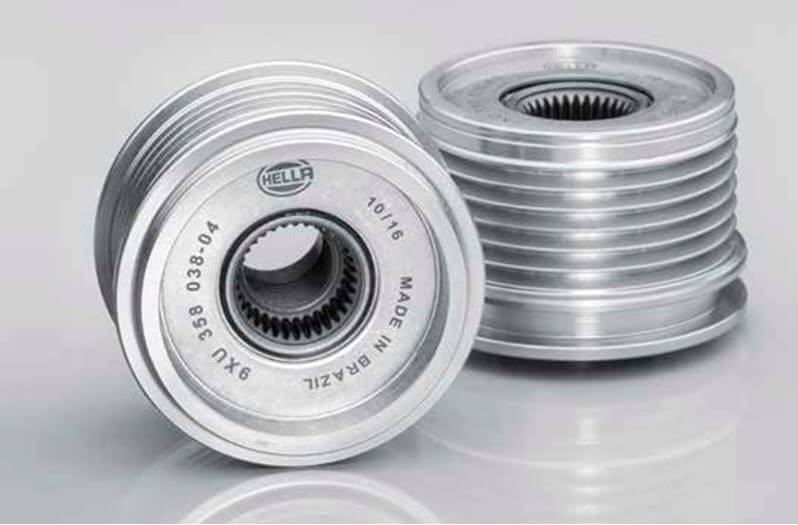
The overrunning alternator pulley, or alternator freewheel clutch, is mounted directly on the drive shaft of the alternator instead of the rigid pulley and has the task of decoupling the three-phase alternator from the rotational irregularities of the crankshaft. This reduces the influence of the moment of inertia on the alternator and the load on the belt drive.

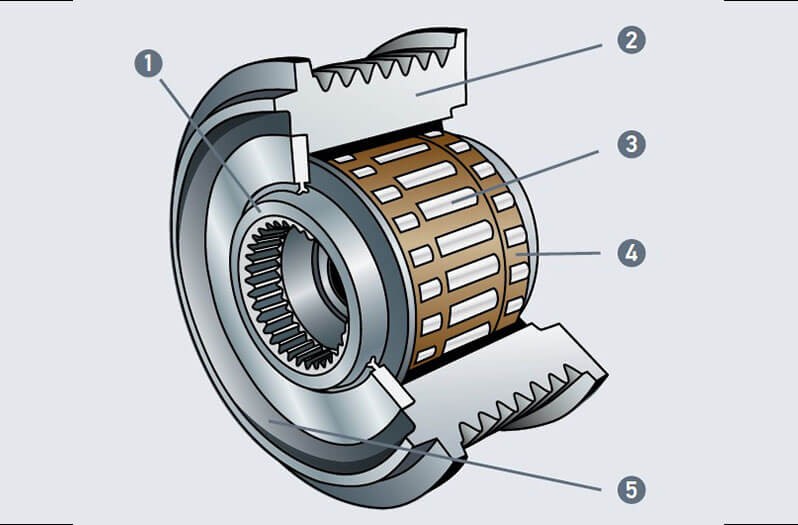
The overrunning alternator pulley is structured as follows:

    1.Inner race with serration
    2.Outer race with profiled raceway
    3.Freewheel unit
    4.Radial support bearings
    5.Overrunning alternator pulley
3. Benefits

Advantages of the alternator freewheel clutch

By mounting an overrunning alternator pulley, only the driving force of one direction of rotation is transmitted to the alternator, thus reducing friction and wear.

Advantages of an overrunning alternator pulley:

  • Reduced impact on the belt drive
  • Reduced fuel consumption
  • Longer lifetime for all components
  • Greater driving comfort and improved noise levels
  • Higher alternator idle speed

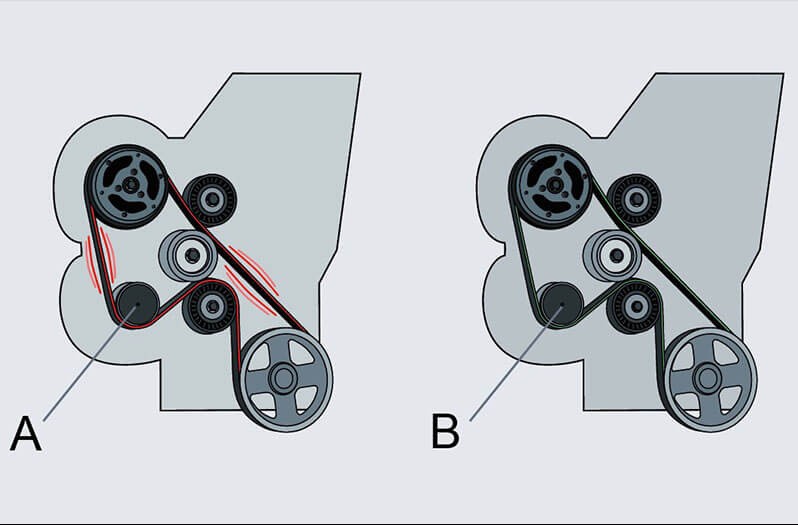
Effects with and without overrunning alternator pulley:

  • Accessory drive with rigid pulley (A): Severe vibrations and resultant thrashing noise from the drive belt
  • Accessory drive with alternator freewheel clutch (B): Reduction in belt vibrations
4. Mounting instructions

Installation instructions for alternator freewheel clutch

Article numbers: 9XU 358 038-xxx and 9XU 358 039-xxx

We recommend the following procedure:

  • Switch off engine
  • Remove ignition key
  • Remove the V-ribbed belts
  • Remove the cover cap on the alternator freewheel clutch
  • Fix the overrunning alternator pulley in place
  • Insert installation tool
  • Rotate installation tool
  • Loosen and remove the alternator freewheel clutch
  • Mount and tighten the new alternator freewheel clutch (tightening torque 80 +/- 5 Nm)
  • Fit cover cap and V-ribbed belts
  • Perform functional check

Important!

Refer to the removal and installation instructions from the relevant
vehicle manufacturer.
  • Installation may only be carried out by a qualified specialist
  • Note tightening torque
  • Do not use pneumatic tools

Jak moc vám tento článek pomohl?

Vůbec nepomohl
5
4
3
2
1
Velmi užitečný
Děkujeme za váš názor!

Nesprávný kód Captcha

Nesprávný kód Captcha

Došlo k chybě

Something went wrong

Vyhledávač náhradních dílů
Číslo dílu Ruční identifikace vozidla Univerzální díly
Přední výrobce
Ostatní výrobci
Řada vozidel Zpět
Vozidlo Zpět

Zadejte číslo OE do vstupního pole. Číslo OE obvykle najdete přímo na náhradním dílu nebo v dokladech k vozidlu.

Vyhledávač náhradních dílů
Určete také náhradní díly podle čísel originálních dílů (OE) Podrobné informace o produktu Najděte velkoobchody ve vašem okolí
dummy
Processing Selected Car
Výrobce
Řada vozidel
Vozidlo
Výkon motoru
Objem motoru
Druh paliva
Rok výroby
Kód motoru

Vyberte kategorii:
Zpět
dummy
Sdílejte
Odeslat přes Kopírovat odkaz
URL byla zkopírována do schránky!
Číslo článku
Number
Číslo článku bylo zkopírováno!
Vyhledávání na webu Návod k montáži
Další podrobnosti
Jméno Hodnota
Zobrazit méně podrobností

Váš prodejce
Autoteile Krammer GmbH
dummy
Lechstraße 1-3
68199 Mannheim
Zobrazit mapu

You might also be interested in

TPS sensor
Základní znalosti
TPS sensor – function & troubleshooting
Learn how to check a throttle potentiometer for defects and recognize the most common symptoms.
Doba čtení: 2 minuty
Throttle valve switch
Základní znalosti
Throttle valve switch – function & troubleshooting
Everything you need to know to diagnose and repair the throttle valve switch - helpful workshop tips.
Doba čtení: 2 minuty
Camshaft position sensor
Základní znalosti
Camshaft position sensor - function & troubleshooting
Learn all about the function and testing of the camshaft sensor and possible symptoms of a defect.
Doba čtení: 2 minuty
Accelerator pedal sensor
Základní znalosti
Accelerator pedal sensor – function & design
Important tips for checking the accelerator pedal sensor and rectifying defects - practical knowledge for your workshop.
Doba čtení: 3 minuty
Injection nozzle/injection valve
Základní znalosti
Injection nozzle/injection valve – Function & checks
Find out how to diagnose a defective fuel injector and replace it in the workshop.
Doba čtení: 6 minut
Základní znalosti
Checking the exhaust gas temperature sensor
Step-by-step instructions for testing the exhaust gas temperature sensor - shown on the VW Passat 2.0 TDI.
Doba čtení: 3 minuty
Idle speed controllers / idle speed actuators
Základní znalosti
Idle speed controller & actuator - function & check
Everything you need to know about testing and troubleshooting idle speed regulators: function, typical symptoms and repair tips for your workshop.
Doba čtení: 3 minuty
Intake-air temperature sensor
Základní znalosti
Intake-air temperature sensor - checking & faults
Discover how to check the intake air temperature sensor for defects and how to replace it efficiently.
Doba čtení: 3 minuty
What is a lambda sensor?: Comprehensive technical information
Základní znalosti
Lambda sensor testing and troubleshooting
Find out how to check and measure lambda sensors - with step-by-step instructions for fault diagnosis.
Doba čtení: 14 minut
Air-mass sensor
Základní znalosti
Air-mass sensor - Function & troubleshooting
Learn how to check a mass air flow sensor, detect defective sensors and replace them professionally.
Doba čtení: 2 minuty